
Ceili Spring ’24 Release Notes
31.1.2024
Here is a traditional Ceili’s summary of the upcoming new features and changes in Salesforce’s Spring ’24 release. Salesforce releases an update package three times a year, which contain major and minor reforms. On this page, we have collected the most important updates that may have an impact on your organization’s Salesforce operation, in a compact package.
The blog post briefly introduces each feature in its own paragraph, which also lists the concrete benefits customers will receive and the necessary measures, if there are any in the update. We are happy to help if you need support in implementing new features. You can contact support@ceili.fi
You can easily find the exact time when Salesforce will install the Spring ’24 Release in your own organization at: status.salesforce.com (Maintenance tab). You can display the information by entering the instance number of your Salesforce organization in the search field, which you can find in Salesforce in your company’s information.
Ceili Spring ’24 Release Notes content:
General updates in Salesforce
MFA Is Turned On by Default Starting April 2024
To prevent unauthorized access to Salesforce accounts, multi-factor authentication (MFA) is mandatory at login. To assist customers in meeting this requirement, Salesforce is making MFA a part of the login process in production environments. This change applies to production environments created on or after April 8, 2024. It also affects existing production environments not included in any MFA auto-enrollment phases between Spring ’23 and Spring ’24. This does not impact test environments (Sandbox). It does not apply to trial environments before they are converted to subscriptions.
Where: This change affects Lightning Experience, Salesforce Classic, and all Salesforce mobile applications in all versions.
When: This change will take effect on April 8, 2024.
Why: Usernames and passwords alone no longer provide adequate protection against cyber-attacks. MFA is one of the simplest and most effective ways to prevent unauthorized account access and to protect personal and customer data. Salesforce requires MFA to help defend against threats such as phishing attacks, password breaches, and unauthorized account access. More information on the value of MFA and how it works can be viewed in this short video.
How: Once MFA is enabled for an organization, users must verify their identity with a username and password, followed by a separate confirmation method. Verification method options include authentication apps, security keys, and built-in authenticators. Each time a user logs into their organization for the first time, they will be directed to register a method. Organizations are granted a 30-day transition period during which users can log in without MFA if they are not yet ready to set up a verification method. If necessary, a Salesforce admin can temporarily disable MFA by removing the “Require multi-factor authentication (MFA) for all direct UI logins to your Salesforce org” setting on the Identity Verification page in Setup. Note, however, that MFA is contractually required, so re-enable it as soon as possible.
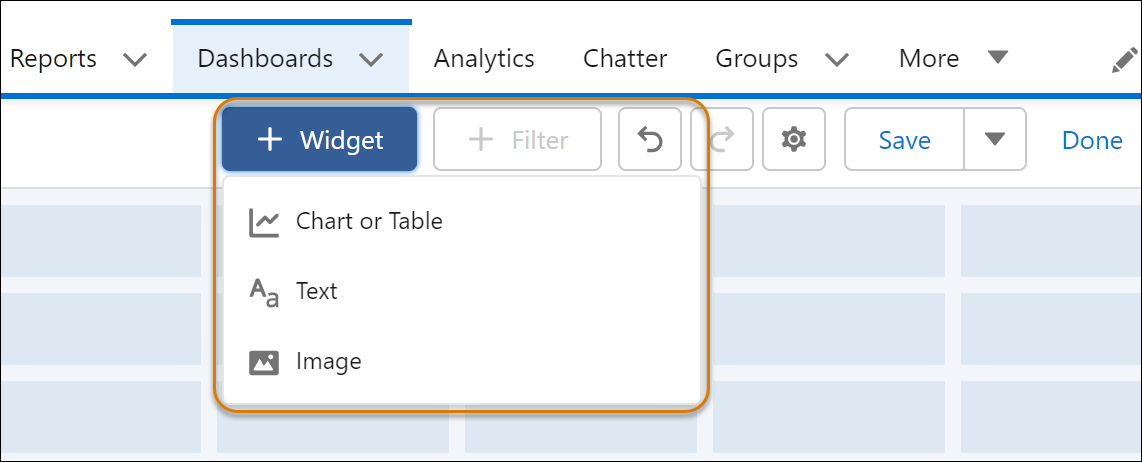
Supercharge Your Visualizations with Images, Rich Text, and Dashboard Widgets in All Salesforce Editions
Salesforce users across all versions can now use rich text and images in Lightning Dashboards. The components of a Lightning Dashboard are now called ‘Widgets’ in all versions. Previously, this feature was available only in Unlimited Edition and Performance Edition.
Where: This change applies to the Lightning Experience in Group, Essentials, Professional, Enterprise, and Developer editions.
How: When editing a Dashboard, click +Widget and choose the type of widget to add (image below). Combine charts, rich text, and images to inform and guide viewers. Settings for widgets, such as size, stretch, and fit to height, do not apply to dashboards delivered through email subscriptions. The image will be displayed at its original resolution within the widget.

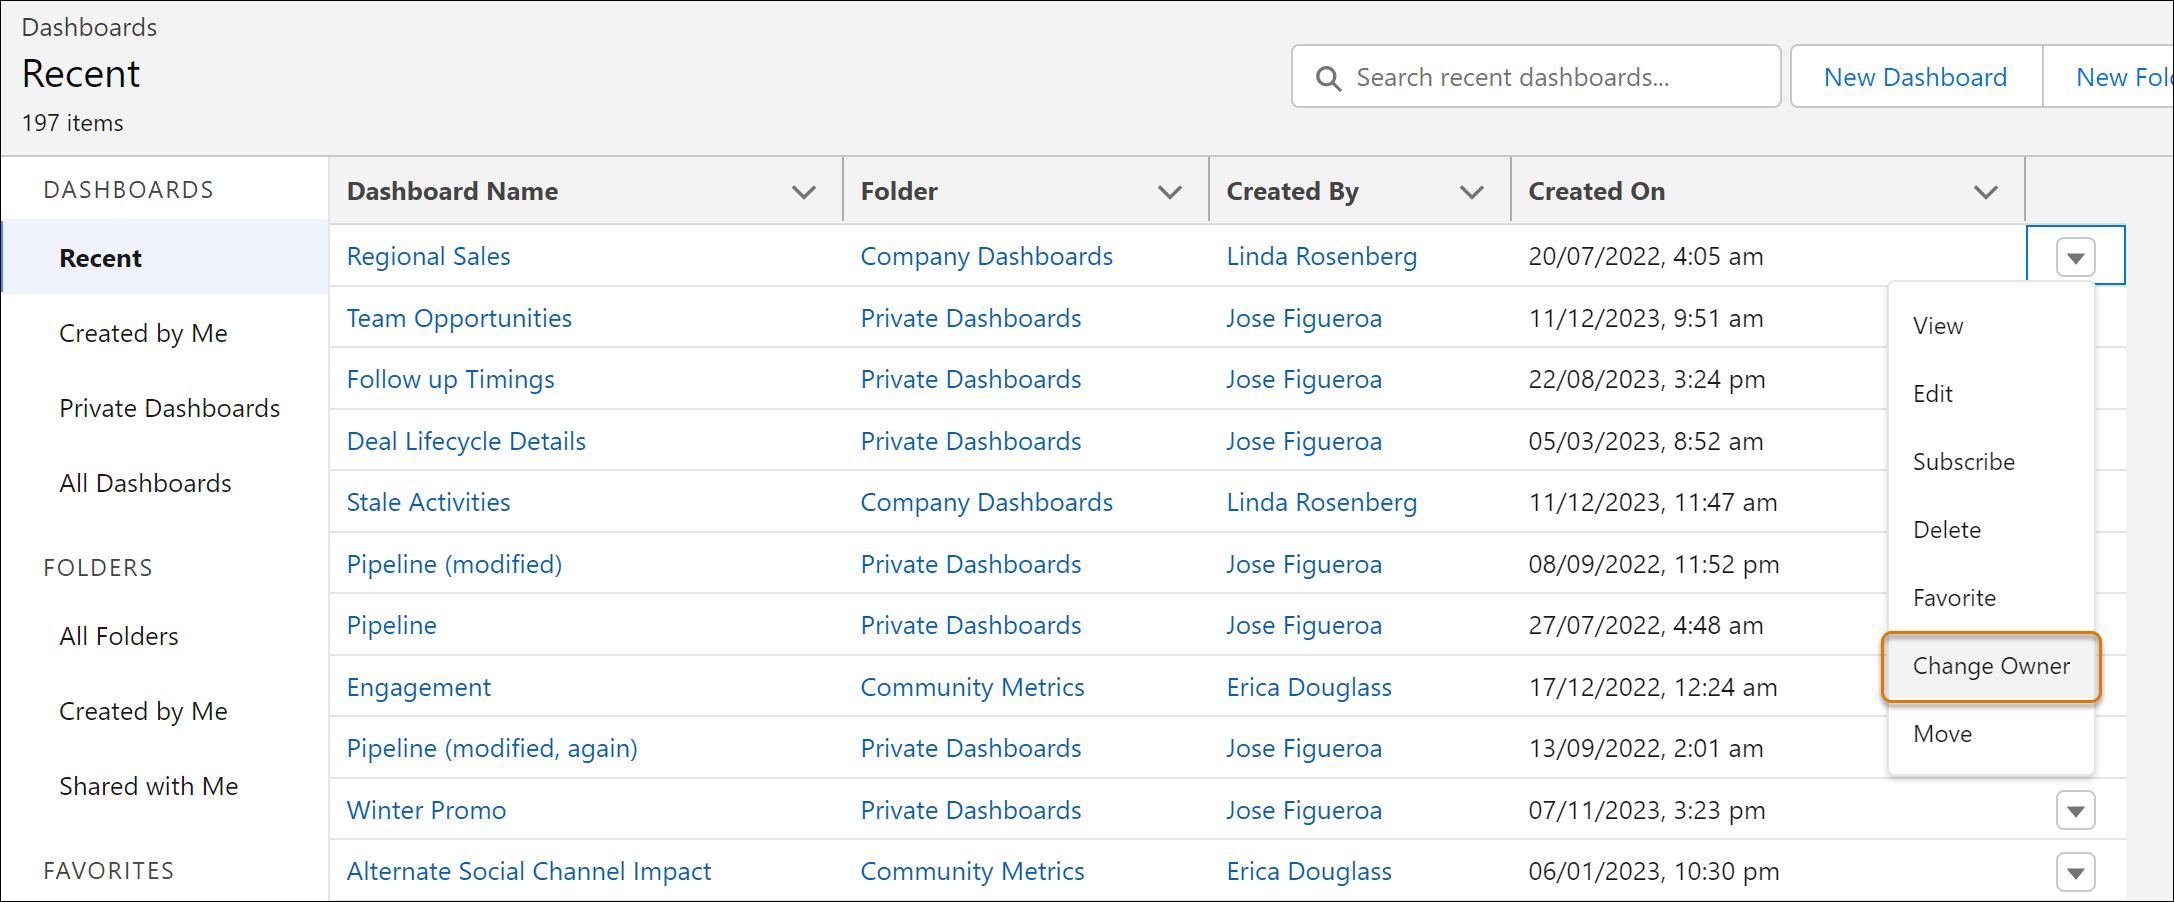
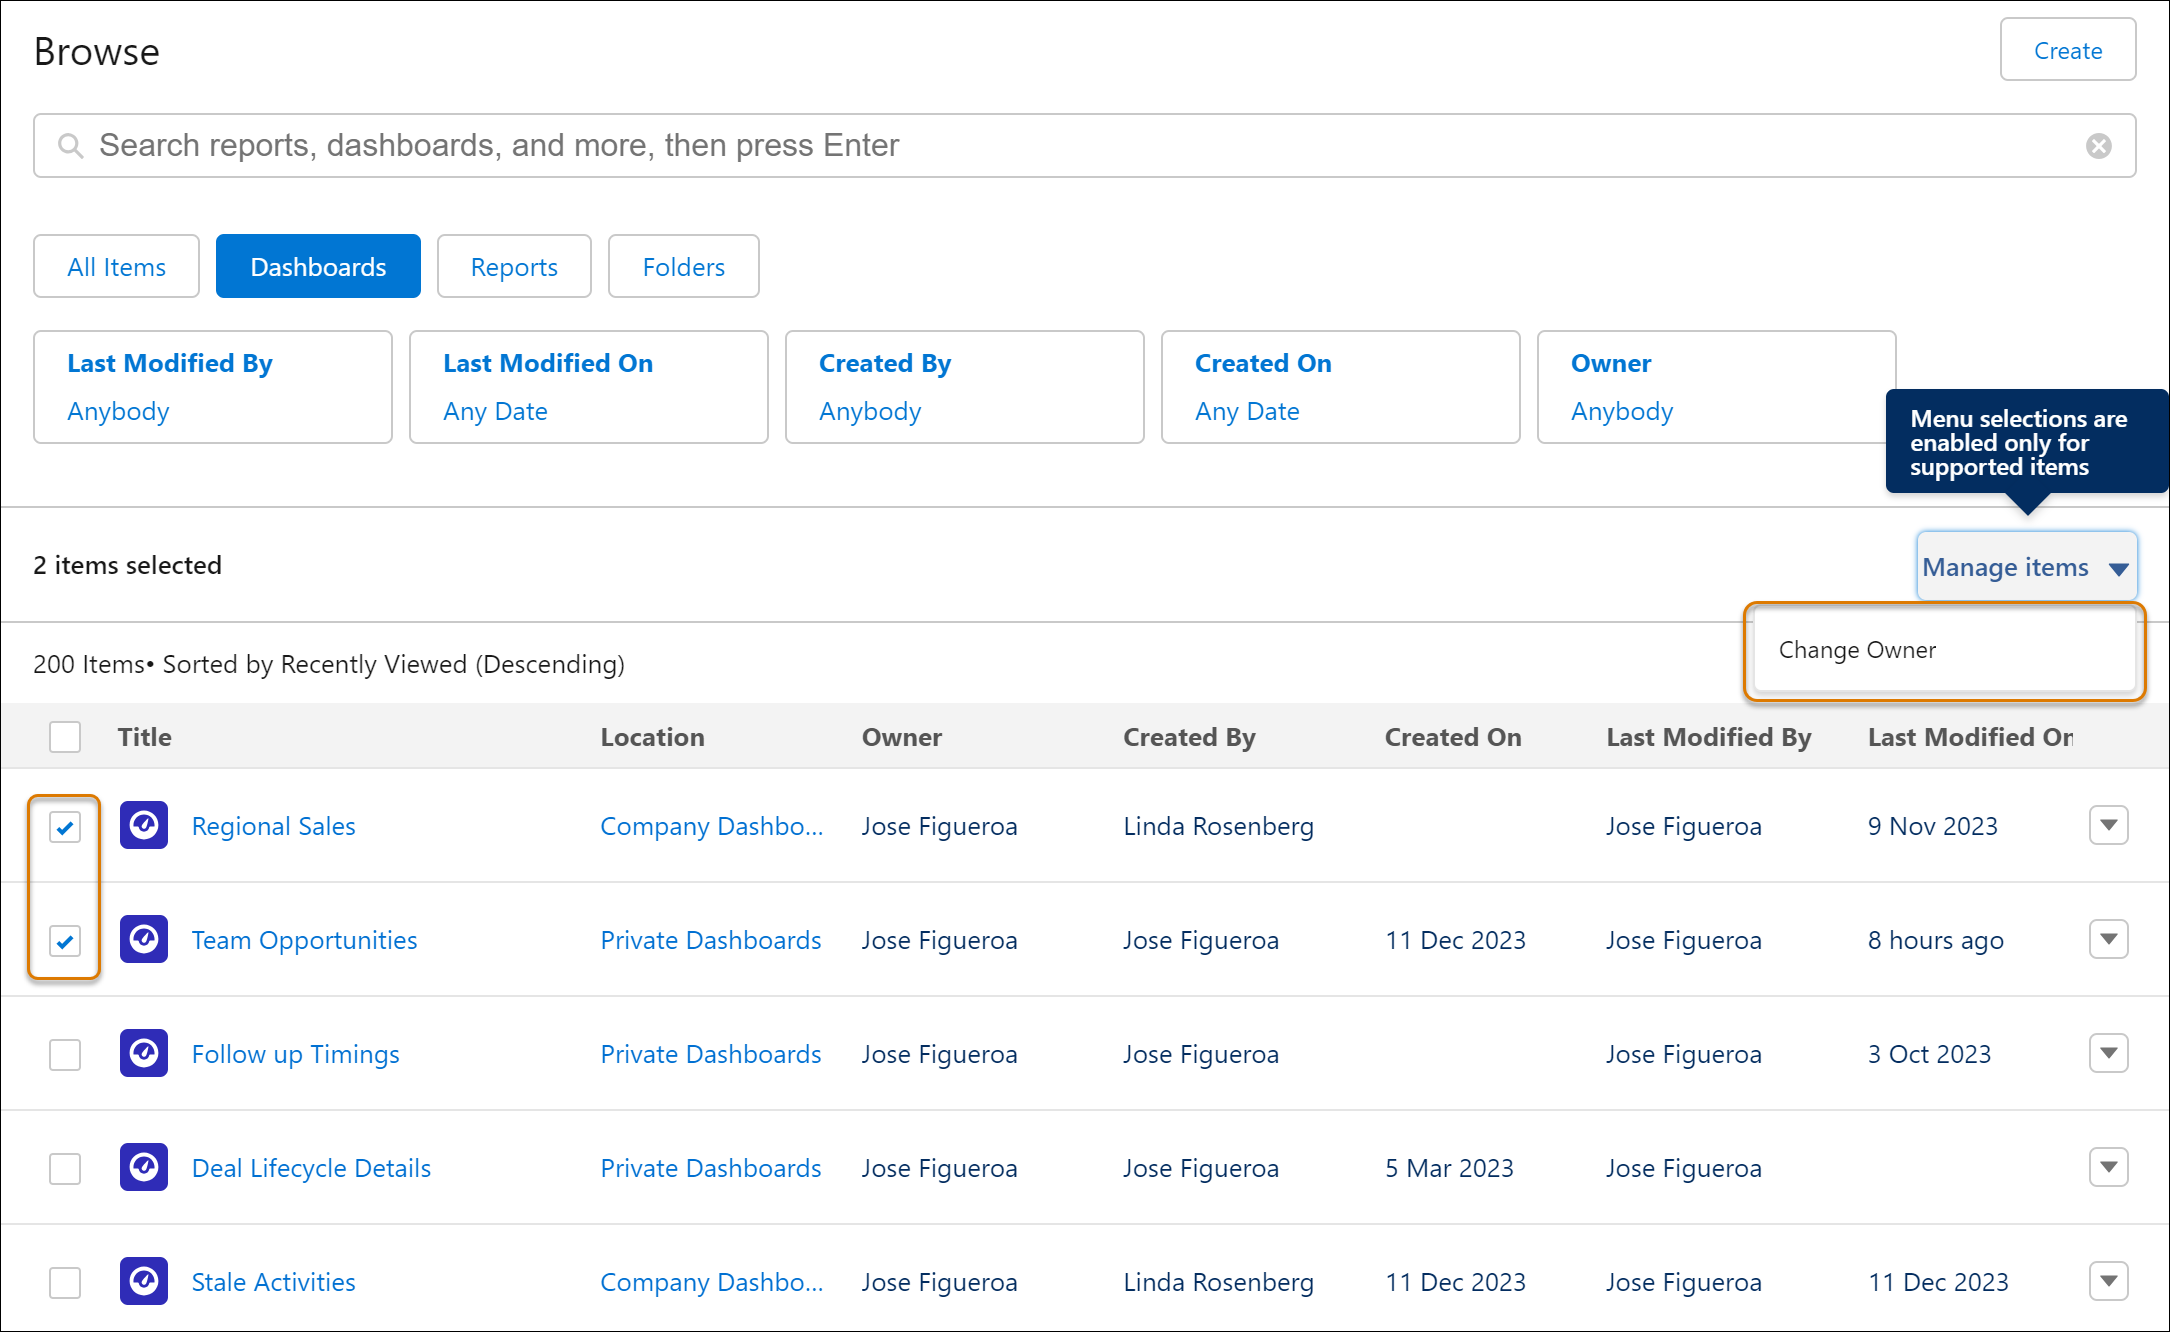
Transfer Lightning Dashboard Ownership
You can change the owner of a Lightning dashboard if your areas of responsibility change or if the current owner leaves your organization. You can transfer the ownership of multiple dashboards simultaneously and send an email notification to the new owner. Previously, a dashboard had to be cloned or recreated for a new owner to gain access to it.
Where: This change applies to the Lightning Experience interface in Group, Essentials, Professional, Enterprise, Performance, Unlimited, and Developer editions.
How: To redirect a single dashboard, select “Change Owner” from the dashboard actions on the Dashboards or Analytics tabs (image below).


See a Field’s Object Relationship and API Name in Dynamic Forms
In the Lightning App Builder, pages equipped with dynamic forms now have two new features for all fields: Object and API Name. The Object feature shows the object to which the field is related, which is useful when a page contains fields from more than one object. The API Name feature displays the unique API name of the field.
Where: This change applies to Lightning Experience in Group, Professional, Enterprise, Performance, Unlimited, and Developer editions.
How: Click on a field in the Lightning App Builder on a page with a dynamic form to see the new API Name and Object features in the properties panel. For cross-object fields, the Object feature will display the field’s object in relation to the base object on the page. For example, if you add an Individual field on a Contact record page and look at its properties, the Object feature will show that it comes from the Contact object.

Translate the Related List Label in the Dynamic Related List – Single Component
Users can be shown the title of a related list in their language by creating a custom label with the desired language translations in Settings.
How: Go to the page in the Lightning App Builder where you want to include a Dynamic Related List. Enter the Related List Title field with {!$Label.customLabelName}, replace “customLabelName” with the name of your custom title, and save the changes. Users whose language is set to the translated custom title’s language will see the translated value. This feature has been implemented based on ideas presented in the IdeaExchange.
Where: This change applies to Lightning Experience in Professional, Enterprise, Performance, Unlimited, and Developer editions.
Use Permission Set Groups in All Editions
For managing user permissions, Permission Set Groups are now available in all versions.
Where: This change applies to Lightning Experience and Salesforce Classic in Contact Manager, Group, Essentials, Professional, Enterprise, Performance, Unlimited, Developer, and Database.com editions.
Reference Picklists, Groups, and Queues in User Access Policies (Beta)
You can now refer to user selection sets, groups, and queues in your user criteria filters for access policies, which simplifies the automatic assignment of users to package licenses, permission sets, and other access mechanisms. The enhanced user interface also makes creating and managing policies quicker and easier. This feature is available as a beta version starting from Spring ’24.
Where: This change applies to Lightning Experience and Salesforce Classic in the Enterprise and Unlimited editions.
How: To use access policies, go to Settings, type User Management Settings in the Quick Find box, and then select User Management Settings. Enable User Access Policies (Beta). The enhanced interface is enabled by default, but you can disable the Enhanced Interface for User Access Policies (Beta) setting.
To create new access policies or modify existing ones, go to Settings, type Access Policies in the Quick Find box, and then select Access Policies.
IdeaExchange Delivered: Confirmation Message When You Select the Multi-Select Picklist Field Type
You will now see a confirmation message (image below) when selecting the multi-select picklist field type while creating a new field. The message reminds you to review the limitations of the multi-select picklist before proceeding. This feature was created based on requests from the IdeaExchange service.
Where: This change applies to both Lightning Experience and Salesforce Classic in all editions.
How: Multi-select picklists can be useful in the user interface and for standardizing data. However, they offer limited reporting capabilities and can be difficult to use in automation and formulas. Use multi-select picklists only in specific situations where their use maximizes their benefits. This confirmation message ensures that you are aware of potential issues when using this field type.

Enforce View Roles and Role Hierarchy Permission When Editing Public List View Visibility (Release Update)
With this update, only users with the “View Roles and Role Hierarchy” permission can see or select from your organization’s role list when they edit the visibility of a public list view. This update is available starting with the Spring ’24 Release.
Why: To edit public list views, a user must have the “Manage Public List Views” permission. After this update is implemented, a user must also have the “View Roles and Role Hierarchy” permission to make a public list view visible to specific roles. A user with only the “Manage Public List Views” permission can still edit the list view but can make it visible only to Public Groups or set it to be entirely public or private. Previously, users with only the “Manage Public List Views” permission were able to view your organization’s roles and make the list view visible to specific roles. If your organization does not use roles, this update does not affect you.
How: To implement this update, go to Setup, type Release Updates in the Quick Find box, and then select Release Updates. Follow the testing and activation instructions in the section “Implement View Roles and Role Hierarchy permissions when editing public list view visibility.”
Where: This change applies to Lightning Experience and Salesforce Classic in Enterprise, Performance, Unlimited, and Developer editions.
When: Salesforce will implement this update in the Winter ’25 release. To get the main release update date for your instance, go to Trust Status, find your instance, and click on the maintenance tab.
Salesforce-Managed App for the Twitter Authentication Provider is Being Retired
The Salesforce-managed application for Twitter authentication will be discontinued with the Spring ’24 release. To continue using this identity service provider for single sign-on (SSO), create your own application on the X (formerly known as Twitter) development platform and update your identity service provider with the new values from your own application. Otherwise, your identity service provider will cease to function.
Where: This change affects Lightning Experience and Salesforce Classic in the Enterprise, Performance, Unlimited, and Developer editions.
How: If you previously left the consumer key and consumer secret values empty when configuring your identity service provider, Salesforce supplied the values using the mentioned application. With this change, you will no longer be able to save a new or existing identity service provider without consumer key and consumer secret values.
In Account Engagement: Since X (formerly Twitter) has made changes to their API terms of service, the Twitter Connector will no longer be available from October 31, 2023, in Salesforce’s Account Engagement.
Preview Mobile Actions on Record Pages Before Activating) (mobile)
When creating actions on record pages in the Lightning App Builder, use the mobile preview option to see how they will appear on mobile devices. The mobile preview also shows whether some actions are available on mobile devices.
Where: This change applies to Lightning Experience on the desktop in Group, Essentials,
Professional, Enterprise, Performance, Unlimited, and Developer editions.
Commerce Cloud
Bring Products to Customers with AI-Powered Search
Customers can now find products more easily in your online store thanks to Einstein’s semantic search. Einstein’s semantic search uses natural language processing to interpret queries and return relevant results that consider synonyms, alternative spellings, typos, and other factors. For instance, Einstein’s semantic search associates terms like “sofa” and “divan” or “sweater” and “pullover,” and returns results that match the searcher’s intent.
Where: This change applies to B2B Commerce and D2C Commerce in Enterprise, Unlimited, and Developer editions.
How: To activate Einstein’s semantic search, first enable Commerce Einstein and your e-commerce activity tracking.
Use Store Setup Tasks to Start Selling Fast
Setup tasks guide you through configuring your online store. After completing the tasks, you can mark them as done to track your progress. The “Add Products” link takes you to a new page where you can choose your preferred method of adding products.
Where: This change applies to B2B Commerce and D2C Commerce in Enterprise, Unlimited, and Developer editions.
How: Click on “Set up store” on the right side of the e-commerce home page.

Easily Set Up Guest Access
Guest access enables unidentified buyers or visitors to visit your store and make purchases. Your products are also discoverable online by anyone. Salesforce has streamlined the steps to enable guest access so that you can complete the process with one click. The guest user profile, settings in the Experience Builder, and default checkout settings are pre-configured. In B2C stores, enabling guest access is essential for buyers to use the store. In B2B stores, guest access is optional and allows unidentified visitors to access the store. Person Accounts must be enabled before you can enable guest access.
Where: This change applies to B2B Commerce and D2C Commerce in Enterprise, Unlimited, and Developer editions.
How: On the homepage of your e-commerce store, select “Administration | Buyer Access”. Under Guest Access, click “Enable”.
Add Express Checkout to Your Cart and Checkout Pages
Simplify your customers’ buying process and increase their conversion rate by accepting digital payments with Express Checkout. This allows your customers to complete their orders using digital payments without entering shipping or payment details. Express Checkout supports multiple digital payment options, including: Apple Pay, Google Pay, PayPal, and Venmo. Express Checkout is not supported on the product detail page.
Where: This change applies to B2B and D2C Commerce on LWR sites in Enterprise, Unlimited, and Developer editions. Express Checkout requires the activation of Salesforce Payments.
How: To activate Express Checkout payment options, create a digital payment method group during the merchant guided setup or from the merchant account details page under the Related tab. In the Experience Builder, add the Express Checkout component (shown in part 1 of the image) to your store’s cart and checkout pages, and enter the payment method group key (shown in part 2 of the image) into the component settings.

Boost SEO with Einstein for Page Meta Tags
Leverage Einstein generative AI to create the page title tag and page meta description fields for products. These fields provide search engines with information about your site and enhance the performance of your search engine optimization (SEO). You can also create and manage page meta tags manually from the SEO tab in the Product record.
Where: This change applies to B2B Commerce and D2C Commerce in Enterprise, Unlimited, and Developer editions. Einstein generative AI is available in the Lightning Experience interface.
How: In the product workspace, select one or more products and click “Create and Review Field Text”.
Split an Order to Ship to Multiple Locations
Allow your customers to order products in a single order to multiple destinations by enabling Split Shipping. At checkout, customers can divide a single shopping cart into multiple shipments using delivery groups. Customers can define up to 10 delivery groups per order and select a shipping method and destination for each. If you want to increase the limit of delivery groups in your Salesforce org, contact your Salesforce admin. Split Shipping does not support orders with subscription-based recurring payments.
Where: This change applies to B2B and D2C Commerce in Enterprise, Unlimited, and Developer editions.
How: Enable “Split Shipping” from your e-commerce Developer Console settings. Choose a page layout so that your customers can see the button on the checkout page. Add the Split Shipping Header component and the Split Shipping Cart Item component to the Split Shipping page.
Set Coupon Redemption Limits
Manage how many times customers can redeem discount coupons and promo codes. Set a maximum number for each customer and maximum uses across all customers. When a coupon reaches the limit you set, it will no longer be valid.
Where: This change applies to B2B Commerce and D2C Commerce in Enterprise, Unlimited, and Developer editions.
How: Create a coupon in the Promotions workspace on the Coupons tab. Enter the maximum number of uses for this coupon in the “Usage Restrictions for All Buyers” and “Buyer-Specific Usage Restrictions” sections.

Customize Promotions with Conditional Rules
Use conditional rules in campaigns to create complex criteria for your product promotions. Define conditions for your offer to boost sales without underestimating your profit margins. Include or exclude certain products, product categories, and product price levels.
Where: This change applies to B2B Commerce and D2C Commerce in Enterprise, Unlimited, and Developer editions.
How: Open or create a campaign in your online store. In the Campaign Rules section, click Edit. Modify the details of the conditions and click Save.

Experience Cloud
Track Site Updates in the New Change History Panel in Experience Builder
Gain insight over time into the changes made to your pages and who is responsible for each area. The Change History panel displays a chronological list of publication dates for Aura or LWR pages. With the update, changes to domain configurations related to the page are also recorded. This feature has been introduced based on ideas proposed in the IdeaExchange.
Where: The change applies to Aura and LWR sites used through the Lightning Experience and Salesforce Classic interfaces in Enterprise, Performance, Unlimited, and Developer editions.
How: To view the panel in the Experience Builder, go to Settings, Change History.
Create Component Variations in Enhanced LWR Sites (Generally Available)
Expression-based components are now generally available on the Enhanced LWR page. Create multiple versions of the same component and use visibility directives to determine who can see the variations. Component variations inherit properties from the default components and remain in draft state until you add visibility directives. Once visibility directives are added, the variation comes out of draft state, and you can set priorities to determine the precedence when multiple conditions are valid at the same time.
Where: The change applies to Enhanced LWR pages accessed through the Lightning Experience and Salesforce Classic interfaces in Enterprise, Performance, Unlimited, and Developer editions.
How: To create variations, go to your component. At the top of the properties panel, select the Component Variants dropdown. Choose New Component Variant. To publish your draft, add a visibility directive. When a component has multiple variations, you can prioritize them so that the one at the top has the highest priority. When none of the variation’s visibility directives apply, your site visitors will see the default component. Make each variation unique by editing its settings and style.
Sales Cloud
Drive Success With Seller Home
Sales team members can now start their day by viewing a clear overview of the business. Seller Home shows users a summary of their opportunities, accounts, leads, and contacts, together with the agenda for the day. Seller Home also allows users to set goals, track progress, and view their task lists, recent records, and connections suggested by Einstein.
Where: This change applies to Sales Cloud Professional, Enterprise, Performance, and Unlimited editions in Lightning Experience.
Why: With more useful information available at a glance, users can direct their activities more efficiently and choose their next steps from a priority list. Seller Home includes:
- Opportunity summary
- Account summary
- Lead summary
- Contact summary
- Weekly or monthly goals
- Today’s events
- Task lists
- Recent Records
- Connection suggestions—identified by Einstein from the user’s emails and events
How: Seller Home is the default Home view for the Sales, Sales Console, and Sales Engagement applications. It appears automatically if you haven’t configured a custom home page or an organizational default for these applications. If you have customized these pages, you can enable Seller Home manually in Setup under the Home item. Once enabled, select App System Default as the Home Page for the Sales, Sales Console, and Sales Engagement applications.

Visualize Customers and Prospects on a Map
Sales representatives can now more effectively plan their customer meetings with Salesforce Maps Lite (image below). Identifying customers and potential clients on a map helps salespeople plan their routes better and reduces time spent traveling.
Where: This change applies to Performance and Unlimited editions of Sales Cloud, Service Cloud, Industry Clouds, and Government Cloud Plus in Lightning Experience. Not available to customers adhering to the Hyperforce European Union Operating Zone data residency requirements.
How: Search for Maps and Location Services settings in Setup and select the Maps Lite feature. Afterward, sales representatives can plot up to 50 accounts, contacts, or leads simultaneously on the map from the Maps Lite tab.
Sales representatives can choose the necessary objects and their lists from those available, browse the list of records, and load different records onto the map. If sales representatives wish to expand their use of the map tool, for example, with Route and Schedule Optimization, they can request a full Salesforce Maps license from their admin.

See Which Leads are Engaging and View Insights
The Lead Intelligence View feature allows sales representatives to quickly get an overview of which potential customers are active and which need more attention. The Lead Intelligence View includes event, email, and Einstein Conversation Insights information, along with activity meters that now include events as well as tasks.
The Lead Intelligence View meters include the following information:
- Not Contacted – No calls or emails in the last year
- Contact Attempted – Outgoing calls or emails in the last 30 days without significant contact
- Engaged – At least one incoming contact has occurred
- Meeting Scheduled – At least one event is scheduled for the next 30 days
- Meeting Declined – Scheduled event declined
- Disqualified – Contact is unqualified or not interested, or they have declined calls or emails
Where: This change applies to Sales Cloud Professional, Enterprise, Performance, and Unlimited editions in Lightning Experience.
How:
- Enable Lead Intelligence View in Lead Intelligence View settings and add the Intelligence View button to the Lead List View button layout in Setup.
- To see the Engagement meters, enable email tracking in Sales Engagement settings.
- To view the Intelligence View, users must navigate to the Lead Home page and click the Intelligence View button.
- To see the meters, select Engagement Metrics from the Metrics menu.
- To view Insights, open the side panel using the icon next to the Lead’s name. Insights appear on the Insights tab when available.
To return to the original List View, click the List View button. In new Salesforce organizations, Lead Intelligence View is included on the home page by default.

Get a Full View of Account Health with the Account Intelligence View
Review customer activities, scan opportunity meters, view cases, and log actions all in one place with the Account Intelligence view. Previously, the customer home page provided only a simple list view and required users to navigate to individual records to view opportunity, activity, or case information.
Where: This change applies to Sales Cloud Professional, Enterprise, Performance, and Unlimited editions in Lightning Experience.
Why: The Account Intelligence view is your dedicated workspace for customer management. In the Account Intelligence view, you can quickly filter accounts (1) and see statistics such as the total value of open opportunities and the next close date for the resulting records (2). To see detailed activity, opportunity, and case information for individual records, click the side panel icon (3) next to the record’s name. In the side panel, you can switch between panels that show activity information or related records (4) or log actions (5) without leaving the Intelligence view.

When: This feature is available in production once all instances have been updated to Spring ’24. To see the feature in Sandboxes, run Match Production License or request an update when the feature is available in production.
How: To see the Account Intelligence view, go to the account home page and click the Intelligence View button. To return to the original list view, click the List View button. For new Salesforce customers, the Account Intelligence View is included on the account home page by default.
Narrow In on Deals with Filter Logic in Pipeline Inspection
Sales representatives can now create a more targeted sales pipeline by using filter logic in the sales pipeline. Previously, the sales pipeline only showed those deals whose details met all the defined filter criteria (AND condition). Now you can use NOT and OR conditions in addition to the AND condition.
How: In the filter panel (1), add the desired filter logic to the Filter Logic field (2) and save. Users can specify the filter logic using parentheses and the AND, NOT, and OR operators.
Where: This change applies to the Lightning Experience in the Sales Cloud Enterprise. Performance and Unlimited versions.

Get More Flexible Pipeline Inspection UI
Users now receive an improved user experience with a more responsive sales pipeline review interface. When you change the screen width, meters and quick filters now scale as needed and move into dropdown menus (image below). This means you can see your meters and the sales pipeline list without the meter area dominating the entire display. Users can also resize the display areas of charts. This feature has been implemented based on requests from the IdeaExchange service.
Where: This change applies to Lightning Experience in the Sales Cloud Enterprise, Performance, and Unlimited editions.

View and Set Forecasts with Forecast Groups
Evaluate future sales according to segments that support your business by grouping estimates into segments. For example, you can divide forecasts by industries or types of sales into their own segments. Creating Forecast groups gives the sales manager more flexibility in reviewing and assessing future sales. Forecast groups are available for Forecast types that are created during or after Spring ’24 and are based on the Opportunity and Opportunity Product objects. You can continue to group forecasts by product family.
Where: This change applies to Lightning Experience in Professional, Performance, and Developer editions, as well as Sales Cloud Enterprise and Unlimited editions.
How: Depending on which object you use for forecasting, add a custom picklist field representing groups to the Opportunity, Opportunity Product, or Product objects. Ensure that the picklist is available in the page layout that your salespeople and sales managers use.
In the settings section, open Forecast Settings and then create a Forecast type based on the Opportunity or Opportunity Product object. Choose to group by the custom picklist you defined. Then select the values within the custom picklist for the Forecast type.
To change selected group values after saving the Forecast type, use the quick action menu in forecast settings and use the “Edit group values” option.

Gain Forecast Clarity with Side-by-Side Adjustment Details
To get a clearer picture of the defined forecasts, display filters as separate columns alongside the forecasts. With the update, you see the original aggregated values before filters as well as the adjustments made by the team and manager in separate columns. This provides clear visibility for making an accurate forecast. Previously, users could only see filters by hovering over the total forecast amount.
Where: This change applies to Lightning Experience in Professional and Developer editions, as well as Sales Cloud Enterprise and Unlimited editions.
How: Go to the Forecast Settings page in Setup and ensure that at least one filter is selected in the Enable Manager Adjustments and Judgments section. Choose the filters to display as columns (1). If necessary, change the names of the added columns to fit your business process (2). For example, you can change the My Commit column name to My Call Number. The settings and column names apply to all Forecast types. Changing the display method of adjustments does not result in the loss of adjustment data.

Access Different Forecast Views in Tabs
If you have multiple active Forecast types, users can now access them more easily using tabs. Users can also choose to display only the forecasts that are relevant to their work. Previously, users selected a different Forecast type by changing the dropdown from the forecast gear icon.
Where: This change applies to Lightning Experience in Professional and Developer editions, as well as Sales Cloud Enterprise and Unlimited editions.
How: On the Forecast page, select Settings to see active Forecast types and choose which ones to display as tabs. All forecast types that are activated after a user makes their forecast selections will be added to the forecast header and announced as new. Users can edit their selections again afterward. The Salesforce mobile app will display only those forecasts selected to be shown as tabs.

Round Forecast Amounts for More Streamlined Forecasts
Starting from October 2023, you have the option to display forecast amounts without decimals, rounded to the nearest whole number. Rounding can free up valuable space and provide a clearer overall picture of the forecasts.
Where: This change applies to Lightning Experience in Professional, Performance, and Developer editions, as well as Enterprise and Unlimited editions in Sales Cloud.
How: On the Forecast page, select ‘Show Rounded Amounts’ from the Display Options menu. All amounts displayed in the forecast summary pane, including amounts in custom calculated columns, will be rounded to the nearest whole number. Total amounts that contain decimals will still be displayed when viewing adjustment and change details. Total amounts with decimal places will also continue to be displayed in the opportunity list header and for each opportunity’s amounts shown in the opportunity list.
Try Sales Programs for Free with Enablement Lite
Explore how sales programs can help you achieve goals and increase the confidence and performance of your salespeople. If you are not yet using Enablement, your company can try it for free. With Enablement Lite, you can create programs, set milestones and goals, manage content, assign users, and track performance with some limitations on the number of programs and users. After the trial, you can consider whether you want to enable the full features of Enablement for your sales representatives.
Available: This change applies to Lightning Experience in Enterprise, Performance, and Unlimited editions in Sales Cloud. Users with the Design and Deliver Enablement Lite programs permissions can create, assign, and track programs for free. Users with the Enable Enablement Lite programs permission can enroll in programs for free.
How: From the Setup, go to the Enablement Settings page and turn on “Try Enablement for free”.
Sales Cloud Everywhere
When sales representatives search for potential customers online, the Sales Cloud Everywhere Chrome extension tracks the webpage they are researching. Sales representatives can update potential and existing customer information and create new records. The grid-like view in the workspace can be used for managing agreements. Custom tabs can be created in the workspace for viewing essential information. Sorting options, additional filters, and enhanced search functionality in the task list ensure that the salesperson focuses on their most important tasks. With the Sales Cloud Everywhere Chrome extension, the side panel is always available and its width can be adjusted to fit the screen.
Where: This change applies to Lightning Experience in Performance, Unlimited, and Enterprise editions.
How: Open Sales Cloud Everywhere from the side panel, the pinned Salesforce icon on the browser toolbar, or by using the keyboard shortcut Ctrl+e (Windows) or Cmd+e (Mac). Note that Sales Cloud Everywhere must be turned on from Salesforce settings, which can be found as follows: Enter ‘Gmail Integration’ in the settings quick search box and select Gmail Integration and Sync. Turn on ‘Use Salesforce Across the Web’.

Enable New Order Save Behavior (Release Update)
When the new order save behavior is enabled, updating an order product causes a change in the main order. Previously in this scenario, Salesforce did not correctly evaluate custom application logic on the main order record.
Where: This change applies to Lightning Experience in Essentials, Professional, Enterprise, Unlimited, and Developer editions.
When: This update was first available in the Winter ’20 release and is mandatory in the Winter ’25 release. To get the important release update date for your instance, go to the Trust Status page, find your instance, and click the maintenance tab.
How: To review this update, go to Setup, enter ‘Release Updates’ in the quick search, and then select ‘Release Updates’.
When the new order save behavior is enabled, whenever an update to an order product causes a change in the main order, Salesforce executes custom application logic. Custom application logic consists of validation rules, Apex triggers and classes, workflow rules, and flows. Previously in this scenario, Salesforce did not correctly evaluate custom application logic on the main order record.
Packages that have created orders before Winter ’21 do not by default support the New Order Save Behavior release update. If you are using a package that relates to orders, wait for confirmation from the package provider before enabling the release update.
Inbox Mobile Is Being Retired
Inbox mobile will be discontinued on February 1, 2024.
Where: This change affects all Lightning Experience versions.
When: The preliminary schedule for the product’s discontinuation is set for February 1, 2024.
Why: Replace Inbox Mobile with Outlook and Gmail integrations to use most of the Salesforce Inbox features. On mobile, use the Salesforce mobile app to access Salesforce data. Exciting new features will become available in the future. For automatic email tracking, you can also use the Einstein Activity Capture service.
Salesforce for Outlook Is Being Retired in June 2024
Salesforce for Outlook -tuotteen lopullinen poistuminen on aikataulutettu kesäkuuhun 2024. Suosittelemme siirtymään uusimpaan Microsoft Outlookin integraatioon ja seuraavan sukupolven tuotteisiimme: Outlook-integraatioon ja Einstein Activity Captureen. Nämä tuotteet korvaavat Salesforce for Outlookin toiminnot ja tarjoavat käyttäjille uusia ominaisuuksia. Pyrimme parantamaan näitä tuotteita jokaisen päivityksen yhteydessä.
Kun Salesforce for Outlook poistetaan käytöstä, se ei enää päivitä kontakteja, tapahtumia tai tehtäviä. Adminit ja käyttäjät menettävät myös pääsyn Salesforce for Outlookin ominaisuuksiin, kuten sivupaneeliin.
Missä: Tämä muutos koskee Lightning Experienceä ja Salesforce Classicia Contact Manager -versioissa, Ryhmissä, Essentials-, Professional-, Enterprise-, Performance-, Unlimited- ja Developer-versioissa.
Service Cloud
Disable Ref ID and Transition to New Email Threading Behavior
This update disables Ref ID threading and moves to Lightning threading in the Email-to-Case feature. With the new Email-to-Case threading, incoming emails are not identified by Ref ID. Instead, they are identified using a security token in the email’s subject or body. If no match is found, Email-to-Case checks the email headers for metadata. This update is scheduled to be implemented in Spring 2025.
Where: This change applies to Lightning Experience in Essentials, Professional, Enterprise, Unlimited, and Developer editions.
Why: The new method meets Salesforce security standards. When Lightning threading is enabled, new outgoing emails will not contain a Ref ID.
How: To check this update, go to Setup, enter “Release Updates” in the Quick Search box, and then select Release Updates. Disable Ref ID and transition to the new email threading behavior by following the testing and activation steps.
When you enable Lightning threading, emails will continue to thread to cases using email headers. If you disable the update and return to using Ref ID, emails may not always thread to previously created cases, which can lead to the creation of new cases.
If “Do Not Automatically Enable New Features” is turned off, we will set your email threading token settings to match the settings for Ref IDs in email subjects and bodies.
If you use merge fields in email templates, replace Case.Thread_Id with the following: Case.Thread_Token.
In your own code, replace Cases.getCaseIdFromEmailThreadId wherever it appears with the following: Cases.getCaseIdFromEmailHeaders.
Improvements to Email-to-Case
The extended default character limit in message fields allows for writing longer content. You can also customize your experience with threading settings and easily direct messages to the right teams.
Where: This change applies to Lightning Experience in Professional, Enterprise, Performance, Unlimited, and Developer editions.
Why:
- The default character limit for email messages has increased from 32,000 to 131,072, so there’s no need to increase your organization’s limit through support cases.
- If your organization uses Lightning threading and a match is not found using tokens, you can now choose how emails are threaded.
- This change gives you more flexibility to choose between using tokens, metadata from headers, or both.
- We have activated the EmailMessage in the User Interface API.
- We added the EmailRoutingAddress field to the Email Message object. This change makes it easier to associate each incoming email with the intended team, even when the team’s email address is hidden in a distribution list or placed in BCC. The EmailRoutingAddress object is visible in the sObject API.
How: To set your threading settings, go to the Email-to-Case page in Setup.
Enjoy a Richer Email Composer Experience
The new Lightning email editor is now generally available. This HTML 5 editor offers a variety of modern features, including a responsive toolbar and an accessibility checker. Handling large recipient lists is no longer an issue when you can drag or copy and paste email addresses of recipients.
Where: This change applies to Lightning Experience in Professional, Enterprise, Performance, Unlimited, and Developer editions.
How: This update is available to Salesforce organizations that use the Email-to-Case feature. Organizations created after Winter ’24 will see the new editor by default. Older organizations can enable the update in Settings.
Transition to the Lightning Editor for Email Composers in Email-to-Case
This update replaces the Email editor used on Casen’s pages for sending emails. The new Email editor is generally available in the Lightning Experience interface.
Where: This change applies to Lightning Experience Essentials, Professional, Enterprise, Performance, Unlimited, and Developer editions.
When: Salesforce will introduce this update in the summer of 2024. To find out the specific update date for your instance, go to the Trust Status page, locate your instance, and click on the Maintenance tab.
Why: The new editor provides similar functionalities as before in the Lightning Experience interface. New features include:
- Full-screen mode
- Printing
- Undo and Redo buttons
- Format painting
- Emoji picker
- Resizing
- Responsive toolbar
- Smart copy and paste functionality
- Drag and drop for file attachments and nested images in the editor
The embed media feature, on the other hand, was removed because most email clients do not allow embedded content.
How: Salesforce administrators will roll out this update. Once the update is in place, users will see the corresponding functionality when composing and editing emails. Some add-ons and more complex features, such as tables, may have limitations. You can revert to the previous editor by disabling the update.
Salesforce AI
Einstein Search Is Enabled by Default
Einstein Search is now enabled in all Salesforce organizations unless your organization has the ‘DoNotAutoEnable’ flag/button turned on. You can opt out of Einstein Search features by disabling them on the Search Settings page. Previously, Einstein Search was not enabled in organizations that did not have MySearchPilot and SearchAssistant permissions.
Resolve and Deflect Issues with Einstein Search Answers (Generally Available)
Enter a question or phrase into the global search, Knowledge sidebar, or Experience page. ‘Search Results’ (Search Answers) retrieves a relevant excerpt from your knowledge articles to answer the question. AI-generated ‘Search Results’ provides a concise answer to your question based on knowledge articles and other sources. With the general availability release, pilot customers using ‘Search Results’ will need to have the required Stock Keeping Units (SKUs) and re-enable ‘Search Results’ to use it again.
Where: This change applies to Lightning Experience, Lightning Knowledge, and Salesforce Experience sites (LWR or Aura) in Service Cloud Unlimited Edition when Lightning Knowledge is enabled. Einstein Search Answers requires the Service Cloud Einstein SKU. Einstein AI-Generated Search Answers requires both the Service Cloud Einstein SKU and the Einstein GPT Service SKU.
How: In the settings, select your preferred search options. Enabling AI-generated Search Answers also enables Search Answers. The activation may take up to 24 hours.
Save Agents’ Time with New Messaging Components for Enhanced Bots (Beta)
Build customer trust and save customer service agent time with authentication, form, and payment communication components, as well as custom components. Enhanced bots can now handle more complex use cases in improved Apple Messages for Business channels. The form component is also available in In-App and Web communication.
Where: This change applies to Lightning Experience and Salesforce Classic in Enterprise, Performance, Unlimited, and Developer editions. Configuration of Einstein Bots is available only in Lightning Experience.
Why: The new communication components support efficient bot interactions with customers.
- Authentication: Verify the customer’s identity
- Custom: Embed an external application into the bot conversation
- Form: Send a form to collect customer information easily and securely
- Payment: Process payments using Apple Pay
Authentication, form, and payment components are a new category of asynchronous communication components. Unlike other communication components, when a bot sends an asynchronous component, the customer can respond to it later.
To ensure a natural conversation experience, you can instruct the bot to wait for the customer’s input or move to the next conversation step. You can also manage the bot’s response to errors by customizing error handling for asynchronous components.
How: Create and manage components on the Communication Components page in the Settings section. To add a communication component to an enhanced bot, go to the Bot Builder’s Conversations page and add the related conversation step to the conversation.

Send a Dynamic File with an Enhanced Bot
Fill out and send files to your customers, such as invoices, using the enhanced bot. Previously, it was only possible to send static files stored in the Asset Library.
Where: This change applies to Lightning Experience and Salesforce Classic in Enterprise, Performance, Unlimited, and Developer editions. Configuration of Einstein Bots is available only in Lightning Experience.
How: To create a file with dynamic content, create an Apex class or flow that populates the file. Then, add the Apex action to the bot builder’s dialogue and select the name of the class you created. Create an ID variable to store the action’s output.
To send a dynamic file, add a File dialogue step immediately after the Apex action. Then, in the Step Properties panel, select ‘Send File’ and choose ‘Dynamic (Content Version Variable)’ as the content type. Enter and select the name of the variable storing the action’s output.

Improve Customers’ Shopping Experience with the Commerce Concierge Bot Template
You can integrate your Commerce Cloud online store with new or existing Einstein bots. Your customers can authenticate in the store, use multiple accounts, place new orders, and leverage Einstein’s generative AI features, such as product recommendations and product feedback.
Where: This change applies to Lightning Experience Unlimited editions with Commerce Cloud Einstein and the Einstein Bots and Digital Engagement add-on. Einstein’s generative AI is available in Lightning Experience.
When: The Commerce Concierge bot template will be available after February 4, 2024.
Einstein Studio in Data Cloud
In Einstein Studio within Data Cloud, you can create your own predictive AI models, import predictions from other models using Databricks, and integrate generative language models (LLMs) from OpenAI and Azure OpenAI. You can use your own AI models in batch transforms, flow actions, and Prompt Builder.
Where: This change applies to Data Cloud in Enterprise, Performance, Unlimited, and Developer editions. Einstein’s generative AI is available in Lightning Experience.
Generate Content with Einstein in Account Engagement
Did you know that you can use Salesforce Einstein to create forms, landing pages, email headlines, and text content directly within Account Engagement? Einstein Assistant helps you describe the type of content you want to create. The more detailed your description, the more useful and precise the results you’ll get. The Einstein Assistant window appears when you are creating a new landing page, form, or email or when you are editing existing content. Once you’ve accepted the use of generative AI, Einstein is ready to assist. If you don’t see the assistant window, please request your administrator to enable it in the Einstein Generative AI Setup.
Available: At the Account Engagement Advanced or Premium level and in Lightning Experience Enterprise, Unlimited, and Performance editions.
Read more: https://help.salesforce.com/s/articleView?id=sf.mcae_einstein_assistant.htm&type=5
Connect Google to Salesforce with a Google Workspace Marketplace App
When you set up Einstein Activity Capture for the first time, you can now choose the new Einstein Activity Capture app from the Google Workspace Marketplace. This authentication method provides controlled access to your Google servers and allows you to manage users directly within the Google Workspace Marketplace app.
Where: This change applies to Lightning Experience in Essentials, Professional, Enterprise, Performance, and Unlimited editions.
How: To use this authentication method, you must be the general system administrator for your company’s Google account. If you are setting up Einstein Activity Capture for the first time, select the Google Workspace Marketplace App as the authentication method.

Resolve User Connection and Synchronization Issues Quickly to Improve Performance
When reviewing the overview and activity of your users in the Einstein Activity Capture Status & Metrics section, you can now link users and resynchronize their data. Additionally, for ease of troubleshooting, you’ll get a comprehensive view of a user’s settings. New event synchronization reports, connection graphs, and initial synchronization data describe user connections and synchronization times to help you enhance performance.
Where: This change applies to Lightning Experience in Essentials, Professional, Enterprise, Performance, and Unlimited editions.
How: To do this, go to Setup, use the quick find to navigate to Einstein Activity Capture, and then select Status & Metrics. On the User Status tab, choose Check User Health from the dropdown menu.

See the Licence Usage and User Status for Einstein Conversation Insights
See information about Einstein Conversation Insights (ECI) licenses and associated video accounts (call recordings). You can upload CSV files for users based on video account status or view the status of ECI users with linked video accounts.
Where: This change applies to Einstein Conversation Insights in Lightning Experience. Einstein Conversation Insights is available in Performance and Unlimited editions and as an add-on to Enterprise edition.
Why: The Connection Status tab displays ECI license usage and video connector status. The ECI License Usage section shows the count of granted ECI licenses compared to available licenses.
The Video Connector Status section shows the number of active users, inactive users, and users needing attention. Active users have at least one linked video account and no accounts in error status. Inactive users have all video accounts either unlinked or turned off. Users with video accounts in error status are categorized as needing attention.
The User Status tab displays the status of ECI users with linked video accounts, including information on whether the video account is linked (active), not yet linked, unlinked (inactive), or in error status (needing attention). You can search by username or filter users by account type or connection status. To ensure calls are processed, make sure the user’s and video account’s email addresses match.
How: You can access these metrics from the Einstein Conversation Insights Status and Usage page in Setup.

Use Einstein Conversation Insights in More Languages
Einstein Conversation Insights now supports 20 additional languages, including Finnish, Polish, and many others. With support for over thirty languages, your sales and service teams worldwide can now use Einstein Conversation Insights to get transcriptions, view call content, and receive coaching recommendations.
Where: This change applies to Einstein Conversation Insights in Lightning Experience. Einstein Conversation Insights is available in Performance and Unlimited editions and as an add-on to Enterprise edition.
How: Einstein Conversation Insights automatically detects the language used in call recordings. The information applies to those languages available in supported languages and your call data settings. Some features related to reports and dashboards may not be fully translated in all languages. Features powered by Einstein, like call summaries, may not support all languages.
To see a complete list of supported automatic content in different languages, go to Call Insights in Einstein Conversation Insights in Setup and select the Automatic tab.

Development
The following changes are key technical updates and enhancements in Salesforce compiled by our developers.
Generally available
Lightning Web Component
- Search for Records with the Lightning Record Picker Component (Generally Available)
- Monitor Component Events with Custom Component Instrumentation API (Generally Available)
Apex
Beta/Preview
Apex
Other
Read our latest content

Salesforce Flex Credits: What Are They and How Are They Used?
Salesforce licensing is changing. Alongside the traditional seat-based model, Salesforce is increasingly introducing consumption-based pricing, where costs depend more directly on what is actually done

Slack – Where collaboration meets your Salesforce context
Starting its exponential growth from the Silicon Valley in the mid 2010s, Slack has since become the standard team collaboration tool used by businesses and

Helvar’s marketing covers the entire customer lifecycle with Salesforce Marketing Cloud
Helvar is a Finnish technology company that develops intelligent lighting solutions by combining lighting, data, and automation. The goal is to improve energy efficiency, the
Salesforce®, Sales Cloud®, and others are trademarks of salesforce.com, inc., and are used here with permission.