
Ceili Summer ’25 Release Notes
21.5.2025
Intro
Here is a traditional Ceili’s summary of the upcoming new features and changes in Salesforce’s Summer ’25 release. Salesforce releases an update package three times a year, which contain major and minor reforms. On this page, we have collected the most important updates that may have an impact on your organization’s Salesforce operation, in a compact package.
The blog post briefly introduces each feature in its own paragraph, which also lists the concrete benefits customers will receive and the necessary measures, if there are any in the update. We are happy to help if you need support in implementing new features. You can contact support@ceili.fi
You can easily find the exact time when Salesforce will install the Summer ’25 Release in your own organization at: status.salesforce.com (Maintenance tab). You can display the information by entering the instance number of your Salesforce organization in the search field, which you can find in Salesforce in your company’s information.
Sisältää:
General updates in Salesforce
Delete Enhanced CMS Workspaces
To keep your Salesforce CMS (file storage) organized and secure, you can now permanently delete any outdated or unused enhanced CMS workspaces. When you delete a workspace, you delete all its content and cancel any scheduled publications, imports, and exports.
Where: This change applies to enhanced CMS workspaces in Lightning Experience in Enterprise, Performance, Unlimited, and Developer editions.
How: Before you can delete an enhanced CMS workspace, remove all CMS channels from it, and unshare it from other workspaces. Then go to the workspace settings to delete it.
Simplify Feature Discovery and Setup with Salesforce Go
Discover and quickly set up features available in your Salesforce edition from one location in Setup. Assign user permissions, complete prerequisites and required configuration steps, and monitor feature usage. Explore the capabilities of unused and new features and access supplemental resources.
Where: This change applies to Lightning Experience in Pro Suite, Professional, Enterprise, Performance, Unlimited, and Developer editions.
Who: To view Salesforce Go, you must have the View Setup and Configuration user permission. To turn on features in Salesforce Go, you must have the Customize Application user permission.
Who: To view Salesforce Go, you must have the View Setup and Configuration user permission. To turn on features in Salesforce Go, you must have the Customize Application user permission.
Why: Learn more about features by watching videos, taking interactive tours, completing recommended Trailhead modules, and reading Salesforce Help articles. Determine whether an available feature is a good fit for your company by sharing these resources with other stakeholders. And if you’ve turned on the Your Account app, you can purchase add-on licenses for some features directly from Salesforce Go.
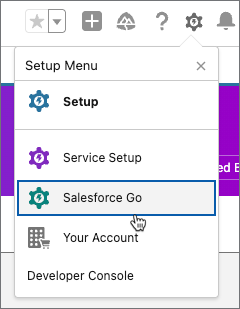
How: From the gear menu, select Salesforce Go.
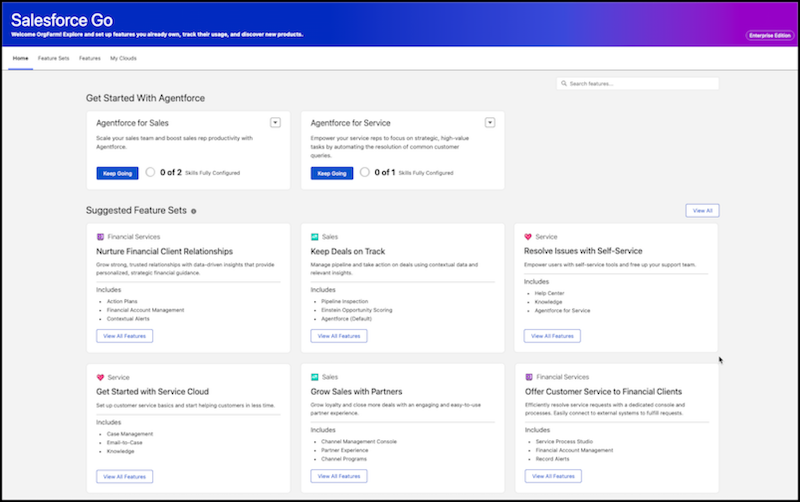
From the Salesforce Go home page, choose a feature set based on your business goal to view and select features to turn on. Or, to choose a feature directly, use the search field on the Salesforce Go Home page, or view your features on the Features tab.
Add the New Setup Domain
Ensure that Setup pages in Lightning Experience load content correctly when browsers block third-party cookies. If your users have general access to the internet, no action is required. If your company controls users’ or servers’ access to the internet through firewalls or allowlists, your IT department must add *.salesforce-setup.com to the company’s list of allowed domains. Salesforce Setup pages are now hosted on that domain.
Where: This change applies to Lightning Experience in all editions.
When: We’re using a staggered rollout to move the Setup pages to the *.salesforce-setup.com domain. The rollout began in Spring ’24 and continued through Spring ’25. As of Summer ’25, the change is enabled in all sandboxes and nonproduction orgs. The rollout is paused in Summer ’25 and resumes for production orgs in Winter ’26 according to the major release upgrade date for your instance.
Sales Cloud
Review and Update Settings to Capture Leads from LinkedIn (Release Update)
If you’re syncing leads from LinkedIn Lead Forms to Salesforce, you must manually disconnect your LinkedIn account, reconfigure the feature by enabling a new setting, and then reconnect your account. Otherwise, LinkedIn leads will stop syncing when LinkedIn retires their legacy Ads Lead Sync APIs. This update was first available and scheduled to be enforced in Winter ’25, but we postponed the enforcement date to Summer ’25.
Where: This change applies to Lightning Experience in all editions with Sales Cloud.
When: Salesforce enforces this update in May of Summer ’25. To get the major release upgrade date for your instance, go to Trust Status, search for your instance, and click the maintenance tab.
Why: LinkedIn updated the APIs used to capture lead data from LinkedIn Lead Gen forms and sync it to Salesforce with two-factor authentication. After you manually enable the Use LinkedIn Lead Sync APIs with Lead Forms setting and connect your LinkedIn account, your Salesforce org can continue to sync leads generated from LinkedIn Lead Gen forms.
How: To review this update, from Setup, in the Quick Find box, enter Release Updates, and then select Release Updates. For Review and Update Settings to Capture Leads from LinkedIn, follow the testing and activation steps. We recommend that you check that your LinkedIn administrator has two-factor authentication set up and can provide you with the verification code when you do the release update.
Leads submitted to LinkedIn while your LinkedIn account is disconnected from Salesforce aren’t synced. Also, if you enable the new setting after the legacy Ads Lead Sync APIs are retired, leads submitted to LinkedIn in that time period aren’t synced. You can manually import these leads into Salesforce.
Confirm Verified Email Addresses for Users Created in 2016 and Earlier (Release Update)
To comply with the latest email security standards, only users with a verified email address can send email from Salesforce. This change affects user accounts created on or before November 1, 2016. User accounts created after that date already can’t send emails unless their email address is verified. This update is available starting in Summer ’25.
Where: This change applies to Lightning Experience and Salesforce Classic (not available in all orgs) in all editions except Database.com.
When: Salesforce enforces this update in Winter ’26. To get the major release upgrade date for your instance, go to Trust Status, search for your instance, and then click the maintenance tab.
How: To identify the affected users, create a list view of users created before November 1, 2016 where the user’s email address remains unverified. Then send email verification links to the affected users.
To review this update, from Setup, in the Quick Find box, enter Release Updates, and then select Release Updates. For Confirm Verified Email Addresses for Users Created in 2016 and Earlier, follow the testing and activation steps.
Identify Users with Unverified Return Email Addresses
Before Spring ’25, users could save an unverified return email address in My Email Settings. Users with an unverified return email address can’t send email from Salesforce. To identify those users and help them avoid issues with features that send email, add the new Return Address and Verified Return Address fields to the Users list in Setup.
Where: This change applies to Lightning Experience and Salesforce Classic (not available in all orgs) in all editions.
Why: Multiple scenarios can affect email address verification. For example, if the Return Address field is blank, a return address was never set for the user and no verification is required.
If you use Domain Keys Identified Mail (DKIM) or an authorized email domain to verify user email addresses, the Verified Return Address can be false for user accounts with emails that are verified via those methods.
How: The Verified Return Address field isn’t available when Enhanced User List View is enabled. To temporarily disable that feature, go to the User Management Settings Setup page and turn off Enhanced User List View.
From Setup, in the Quick Find box, enter Users, and then select Users. Add or edit a list view, and add the Verified Return Address and Return Address fields. Filter the list to exclude users with no Return Address. If you use DKIM or an authorized email domain for email verification, also filter the list to exclude the related domains from the Return Address field. Then instruct the users on the list to verify their return email address by clicking Resend Verification Email in My Email Settings.
Salesforce for Outlook Is Being Retired in December 2027
For the latest integration with Microsoft Outlook, we recommend moving to our next-generation products, the Outlook integration and Einstein Activity Capture. These products replace Salesforce for Outlook features and give users new capabilities. We continue to introduce enhancements for these products every release.
Where: This change applies to Lightning Experience and Salesforce Classic in Contact Manager, Group, Essentials, Professional, Enterprise, Performance, Unlimited, and Developer editions.
How: When Salesforce for Outlook is retired, it will no longer sync contacts, events, or tasks. Admins and users also lose access to Salesforce for Outlook features, such as the side panel.
Sales Cloud Go is Now Salesforce Go
With Salesforce Go, you can discover, set up and configure Sales Cloud features. You can also track feature usage, all from one location. Learn more about features and get help with configuration by accessing content resources and links. If you turned on the Your Account app, you can purchase add-on licenses for some features directly from Salesforce Go.
Where: This change applies to Lightning Experience in Pro Suite, Professional, Enterprise, Performance, Unlimited, and Developer editions.
Customize Seller-Focused Mobile Experience (Generally Available)
Add native pages for custom objects and customize the layout of record home pages in Seller-Focused Mobile Experience. Mobile Builder for Seller-Focused Experience is now generally available.
Where: This feature is available in Lightning Experience in all editions. The Seller-Focused Mobile Experience for Android and iOS is available on phones and tablets in all editions, except Database.com, starting with mobile version 254.000.
Log all Tracked Emails in Email Integrations
Email logging and tracking are now combined into one section of email integration, simplifying the email integration experience and making mail management more consistent. Also, emails must be logged to get tracked. Users see the combined information in a Log and Track Email section in the email integration side panel. Control logging and tracking from settings in the email component. Previously, email tracking was handled in a separate component and logging wasn’t required for tracking.
Where: Email integration and Einstein Activity Capture are available in Lightning Experience in Starter, Professional, Enterprise, Unlimited, and Einstein 1 Sales Edition editions. Also available with the Einstein for Sales, Sales Engagement, or Revenue Intelligence add-ons.
Inbox is available in Lightning Experience. Certain features are available with Sales Cloud and included in Starter, Professional, Enterprise, Performance, and Unlimited editions. All features are available with Inbox, Sales Engagement, or Sales Cloud Einstein.
Who: This feature is enabled automatically for Outlook and Gmail integrations, Inbox, and Einstein Activity Capture (EAC). The option to log emails when sent is only available to EAC users when Sync Email as Salesforce Activity is turned on. See Salesforce Help for more prerequisites.
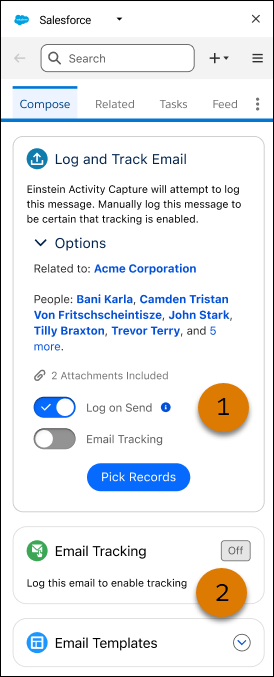
How: To track an email, it must be logged.
- Turn on Log on Send (1) to automatically log the email. To also use open and link click tracking, turn on Email Tracking.
- The read-only email tracking card (2) tells you the default tracking setting.
Service Cloud
Hourly Single Email Send Limit Updated for Case Lightning Email Composer
The hourly single email send limit now includes emails sent using the Case Lightning Email Composer. This change ensures that each user can send emails to a maximum of 250 external recipients per hour.
Where: This change applies to Lightning Experience.
Why: This update ensures consistency in email sending limits across different use cases. It replaces the previous limitation that applied to emails sent from the Email Composer in Lightning Experience.
How: To send automated case emails, use QuickActionRequest.
Secure Your Conversations in Messaging for Web with reCAPTCHA
Looking to safeguard your Messaging for Web channels from automated threats? To make sure only human users initiate new messaging sessions and to enhance your defense against spam bots, enable reCAPTCHA v3.
Where: This feature applies to Messaging for Web and is currently available only to REST API and Web customers — not yet for Mobile. View required editions
Why: Unprotected messaging channels are vulnerable to spam, resource waste, and diminished user experience. reCAPTCHA strengthens security by blocking bots, ensuring your team can focus on genuine customer interactions.
How: Sign up on the Google reCAPTCHA website and register your domain for reCAPTCHA v3. In Setup, turn on reCAPTCHA Verification in Messaging settings, add your API keys from reCAPTCHA registration,and click Save. Publish to apply the changes.
Legacy Chat Is Being Retired
Legacy chat is scheduled for retirement on February 14, 2026, and is in maintenance mode unit then. You can continue to use chat until that date, but we recommned transitioning to Messaging for In-App and Web for modernized customer communication. Messaging offers many of the chat features that you love plus asynchronous conversations that can be picked back up at any time.
Where: This change applies to Salesforce Classic and Lightning Experience in all editions.
How: As of February 14, 2026, legacy chat will be removed and you can’t access or use chat. To avoid service interruptions to your customers, migrate to Messaging for In-App and Web before that date.
Gather Feedback to Improve Your Knowledge Base (Generally Available)
Use Knowledge Feedback to capture feedback on your Knowledge articles and assign feedback responses to the appropriate people or teams for action. It’s a great way to see how useful your articles are and to identify areas for improvement. This feature helps keep your articles relevant and up to date, making sure that Agentforce responses are accurate and helpful.
Where: This change applies to Lightning Experience in Unlimited Edition and all other editions with the Knowledge add-on license. This change also applies to Experience Cloud sites built on Aura sites accessed through Lightning Experience in Enterprise, Performance, Unlimited, and Developer editions. You must have at least 1 active community license in your org to use this feature.
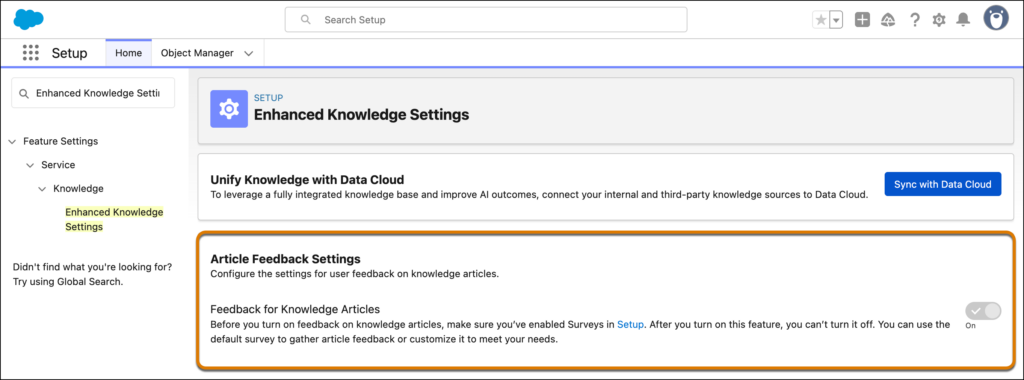
How: Before you turn on Knowledge Feedback, make sure that you turn on Lightning Knowledge and Salesforce Surveys. In Setup, go to the Enhanced Knowledge Settings page. In the Article Feedback Settings section, turn on Feedback for Knowledge Articles.
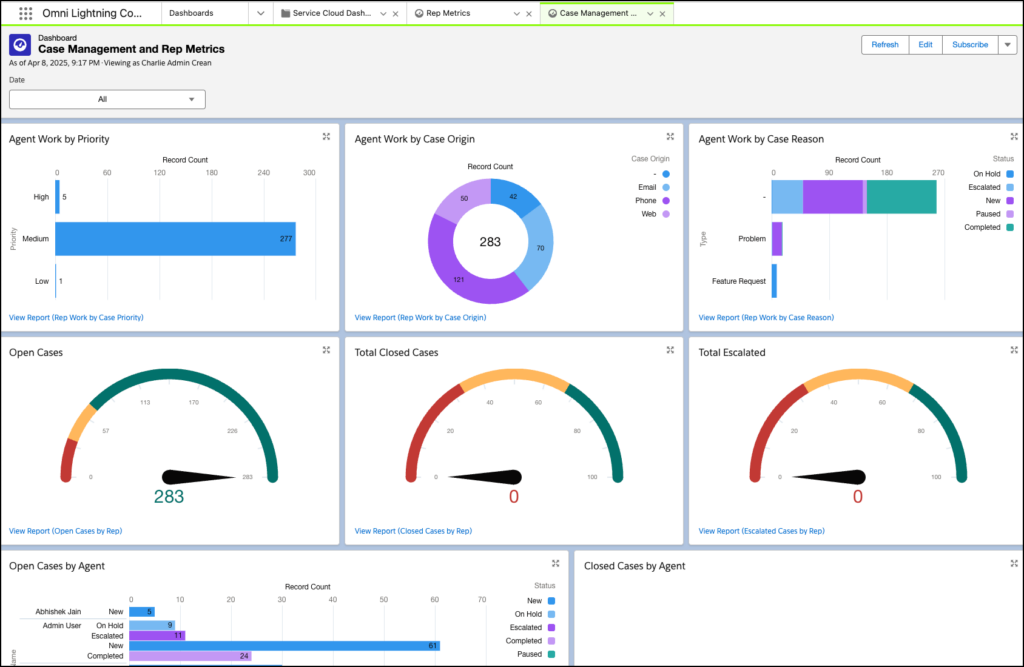
Simplify Your Service Cloud Reporting with Prebuilt Dashboards and Reports
With Service Cloud Reporting, track performance, monitor SLA adherence, and boost contact center efficiency. Gain insights into cases, rep performance, and queue efficiency by monitoring critical KPIs such as average handle time. Service Cloud Reporting is available with Enhanced Omni-Channel only.
Where: This change applies to Lightning Experience in Enterprise, Performance, Unlimited, and Developer editions.
Who: Users with the View Setup and Configuration user permission can install the Service Cloud Reports from Setup.
How: To get these standard dashboards and reports, from Setup, go to Service Cloud Reports, select the dashboards and reports that you want to install, and then click Install. To view the reports and dashboards, open the Reports or Dashboards navigation item in the Service Console, and then select the dashboard or report to open.
If you previously installed these dashboards and reports from the Omni-Channel Performance Dashboard package on AppExchange, uninstall the package, and then install this latest, optimized version.
Notify Senders About Email-to-Case Processing Errors
You asked, we listened. With this new organization preference, end users are notified when Email-to-Case can’t process the email they sent to your organization.
Where: This change applies to Lightning Experience in Essentials, Professional, Enterprise, Unlimited, and Developer editions.
How: This preference is off by default. Enable it on the Email-to-Case page in Setup. As an organization administrator, you are already notified in the event of an Email-to-Case processing issue. If you allow end users to get this notification as well, they might try to re-send the email. This can cause duplication if you do the same.
Sulje tapaukset nopeammin lisäämällä Sulje Tapaus -painike objektin sivulle Lightning Experiencessä
After resolving a customer’s case, service reps can close the case directly from the case details page by clicking the Close Case button. This saves time that would be wasted navigating elsewhere to close the case.
Where: This change applies to Lightning Experience in Group, Professional, Enterprise, Performance, Unlimited, and Developer Editions.
Why: Before this change, you had to create a custom button to close cases. You had to navigate to the custom button to close a case.
With this change, the Close Case button is available in page layouts and you can add it to the case details page. By using the Close Case button, service reps can directly close a case from the case details page. This makes the process easier for service reps, who close cases on a regular basis and increases their efficiency.
How: For new customers: The Close Case button is enabled by default and will be visible on the case details page.
For existing customers: Navigate to Setup and click Object Manager. In Object Manager, search for Case Page Layouts and select it. From Mobile and Lightning Actions, drag the Close Case button into the Salesforce Mobile and Lightning Experience Actions section. Click Save.
You can configure whether the Close Case button appears on the case details page directly or in the dropdown menu on the page. You can also configure what fields are displayed on the Close Case page.
Marketing Cloud
Marketing Cloud Account Engagement
Expand your prospect marketing channels by integrating WhatsApp with Account Engagement. Connect a WhatsApp business account to get started. Then, marketers can access WhatsApp marketing channels through Marketing Cloud for use in Account Engagement.
Where: This change applies to Salesforce Enterprise and Unlimited editions with Marketing Cloud Account Engagement Growth, Advanced edition.
Quickly Pinpoint Failed Email Sends
A new Failed Email Sends report is available for your business unit. The report includes failure reasons such as missing content, invalid email addresses or sender domains, along with a timestamp and related prospect. Look for failed email send alerts in the Optimizer.
Where: This change applies to Marketing Cloud Account Engagement Growth, Plus, Advanced, and Premium editions.
Gain Control of Bot-Like Prospects by Deleting Excessive Visitor Records
Account Engagement can pause activity tracking for prospects with an excessive amount of activity if it impacts your business unit’s performance. Now you can automatically delete excessive visitor records from bot-like prospects before they get paused, or restore currently paused prospects by automatically deleting excessive visitor records. We also added the ability to manually delete visitors from a bot-like prospect for even more control.
Where: This change applies to all Marketing Cloud Account Engagement editions.
Why: To impact Account Engagement’s performance, a prospect would have to accumulate thousands of activities. This high level of activity is usually the result of a bot. However, it’s possible for excessive activity to happen because Account Engagement’s tracking code is placed on a page that gets a lot of traffic. To avoid excessive clicks, use the tracking code only on specific landing pages instead of home pages.
Dismiss Configuration Issues in Optimizer
Focus on business-critical issues by dismissing Optimizer configuration warnings that don’t apply to your business or marketing strategy. If needed, you can restore hidden configuration issues in Optimizer.
Where: This change applies to all Marketing Cloud Account Engagement editions.
Marketing Cloud Growth / Advanced
Save Time with New AI Capabilities for Reporting and Marketing Automation
Let Einstein take more work off marketers’ plates by creating reports and automating flows based on predicted engagement. Plus, use a data graph to enhance Einstein Send Time Optimization and easily retrieve record scores with Agentforce.
Where: These changes apply to Salesforce Enterprise and Unlimited editions with Marketing Cloud Growth and Advanced editions.
1. Create Reports for Einstein Predictive Features
Analyze the effectiveness of Einstein Engagement Frequency and Einstein Engagement Scoring in your Marketing Cloud campaigns by using new reports. To create these reports with Data Model Objects in Data Cloud, select the Email Engagement Frequency or Email Engagement Score object.
SEE ALSO | Salesforce Help: Data Cloud Reports for Einstein Features in Marketing Cloud (can be outdated or unavailable during release preview)
2. Automate Flows Based on Einstein Predictive Features
Direct contacts down different paths based on engagement predicted by Einstein Engagement Scoring and Einstein Engagement Frequency. Users can run more effective customer reengagement campaigns by ensuring the right audience gets the right number of messages without overwhelming them. After you create a data graph, users can build a flow that includes the Einstein Decision element. In the configuration pane of the Einstein Decision element, select any of the data graph fields as the Resource in a condition.
SEE ALSO | Salesforce Help: Enable AI Features in Marketing Cloud (can be outdated or unavailable during release preview)
3. Bring Data Graph Capabilities to Einstein STO Scores
An update to the Einstein Send Time Optimization (STO) data model allows you to build a data graph for STO. After you disable and reenable STO in Einstein for Marketing Setup, users can build and use data graphs to capture, automate, and personalize email send time data.
SEE ALSO | Salesforce Help: Setting Up a Data Graph for Einstein STO Scoring (can be outdated or unavailable during release preview)
4. Find Record Scores Quickly in Marketing Cloud with Agentforce
Use the Marketing Cloud: Get Score for Record ID action with Agentforce to gain insights into customer engagement and fit. This action retrieves the engagement and fit scores for lead, contact, and prospect records. Account scores appear in a separate bulleted list, including an overall account score and intent score. To enable these actions, turn them on in the Agent Actions section of Agent Studio in Salesforce Setup.
Enjoy More Control Over Campaigns and Flows
Managing your campaigns, related flows, and content is easier than ever. Build a campaign from the ground up and add flow elements from the campaign record. Plus, quickly send an email campaign to a list of opted-in leads or contacts.
Where: These changes apply to Salesforce Enterprise and Unlimited editions with Marketing Cloud Growth and Advanced editions.
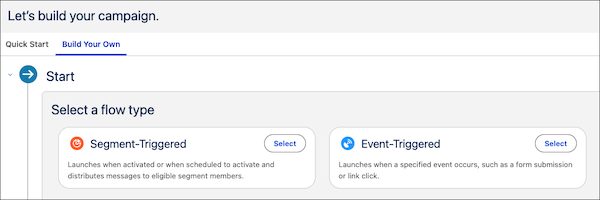
1. Build a Custom Campaign
Now marketers can begin working on a campaign without using one of our quick start options. Create a campaign and select the Build Your Own tab. Marketers can select Build Your Own when they create a campaign, select a flow type, and build the campaign as they go. They can add message elements from the campaign record, or work in Flow Builder to create a more curated customer experience.
2. Manage More of Your Flow from the Campaign
It’s easier than ever to build out a marketing flow without leaving the campaign record. When a flow has 5 or fewer elements, add messages and wait elements from the campaign itself. Message details like Einstein Send Time Optimization and tracking options are also configurable from the campaign record.
3. Send to a Lead or Contact List
Marketers can now send an email directly to leads or contacts who are opted in to receive marketing messages from your business. From any lead or contact list view in the Marketing app, click Send Email. Select the marketing email option, and then follow the prompts to create and send your content. We take care of creating the campaign, flow, and audience segment for you.
Create Customized Content More Efficiently
Improved content tools make it easier to create more personalized customer experiences. Directly customize the HTML for an email, add repeater components, and personalize email images and buttons with merge fields and dynamic URLs.
Where: These changes apply to Salesforce Enterprise and Unlimited editions with Marketing Cloud Growth and Advanced editions.
1. Create Emails with Custom HTML
Get more control over your email messages with the new HTML code view for emails. Convert an existing email to HTML, make detailed edits to the structure or stylesheet, and build highly customized, responsive emails of your own design.
2. View and Manage Data Sources in Emails More Easily
The improved Data Sources tab gives marketers more visibility into the data sources that power merge fields and personalization in emails. Previously, marketers could only add an event data source in the content builder. Now, they can add and update data sources in the builder before publishing an email, and they can view all available data sources, including the default data graph or unified individual.
3. Show Related Content in a Consistent Layout with Repeater Components
Show customers recent purchases, popular products, or other relevant content in marketing emails. The repeater component dynamically shows items in a consistent card, list, or custom layout. Connect the repeater to an available data source, and use merge fields to show details about each item in the repeater, such as product names, descriptions, and images.
4. Share Custom Links and Personalized Images with Email Recipients
Personalize emails with dynamic images and customize the button experience for each audience. Input a merge field or dynamic URL for an image component source or for a button action.
5. Use New Field Types for Data Source Objects in Forms
New field types for data source objects in forms provide more flexible and precise data collection based on the data types. Field types include date, date/time, time, and number for scheduling, time-sensitive, and numerical data. Plus, the Text Area (Long) field now displays a larger input area and provides a draggable corner to resize the field.
Gain Valuable Insights with Enhanced Reporting Options
Now marketers can track and report on custom links to pages on external websites, and attribute that tracking data to a campaign. You also get improved deliverability metrics for Marketing Performance dashboards and improved page view metrics for your external websites.
Where: These changes apply to Salesforce Enterprise and Unlimited editions with Marketing Cloud Growth and Advanced editions.
1. Track Links That Drive Traffic to Your Website
Now you can track links to your external website back to a specific source, such as an ad or email. If you set up external tracking before Summer ’25, update the required Behavioral Events data stream to take advantage of the latest tracking capabilities.
2. Collect First-Touch Page View Data When a Visitor Consents to Tracking
When a site visitor opts in to cookie tracking on a connected external website, their initial page view data is now reported. If a visitor doesn’t opt in to tracking, no tracking is reported.
3. Monitor Email Performance with Deliverability Dashboard
The new Deliverability dashboard tab in Marketing Performance helps marketers analyze your top and bottom-performing campaigns. Explore performance metrics to understand the reasons for failed email deliveries. Plus, the embedded Deliverability dashboard on individual campaign records reveals campaign-specific deliverability performance of sent emails.
4. Maximize Your Content Impact with Performance Dashboard
Track the performance of your email, SMS, WhatsApp, tracked links, and landing pages directly from the content records. Gain valuable insights on audience engagement, evaluate how dynamic content variations perform, and use these insights to drive interaction. View all the key metrics in a centralized location to make informed, data-driven enhancements to your content strategies.
Commerce Cloud
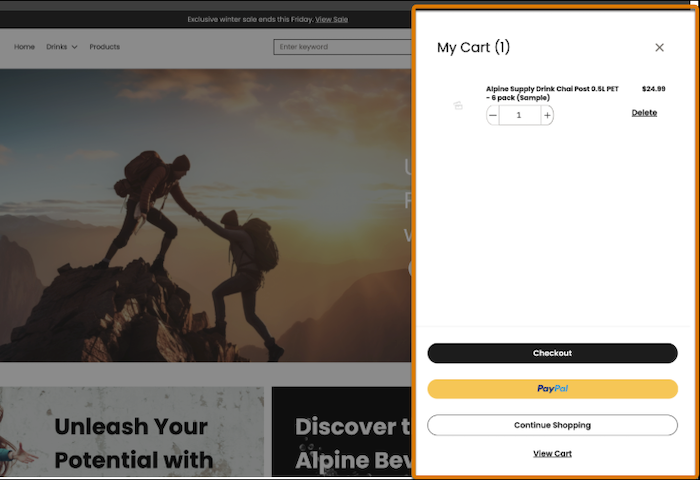
Add Express Checkout in the Mini Cart for Faster Purchases
Make it easier for shoppers to complete their purchase by adding express checkout to the mini cart. Mini cart is a widget which saves customer extra steps and clicks. Shoppers can use PayPal, Venmo, Apple Pay, Amazon Pay, Google Pay, or Link to easily check out, reducing cart abandonment and increasing conversion rates.
Where: This change applies to B2B Commerce and D2C Commerce in Enterprise, Unlimited, and Developer editions.
How: Go to the store’s home page in Experience Builder, and enable express checkout in the Cart Badge component properties.
Customers see the first eligible express checkout option in the mini cart, based on the order in the payment method set that you specify in the cart badge component. If no express payment qualifies, none is shown.
Handle Split Payments with Custom Checkout
Give your customers more payment flexibility with split payment support in custom checkout. With this feature, customers can use multiple credit cards to complete a purchase.
Where: This change applies to B2B Commerce and D2C Commerce in Enterprise, Unlimited, and Developer editions.
How: Use Checkout APIs to set up split payment support. Your store must have streamlined place order, high-scale orders, and Cart Calculate API enabled.
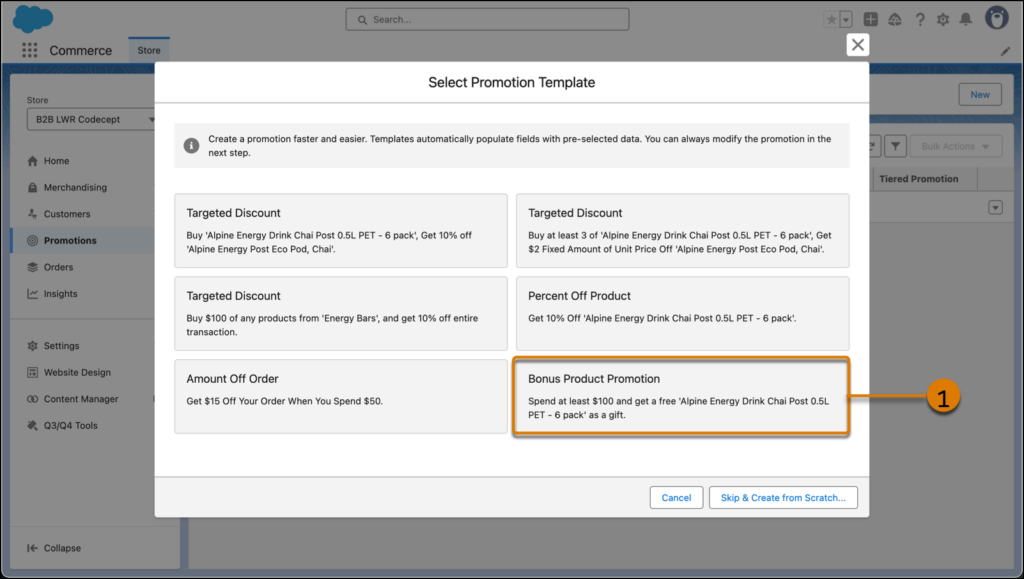
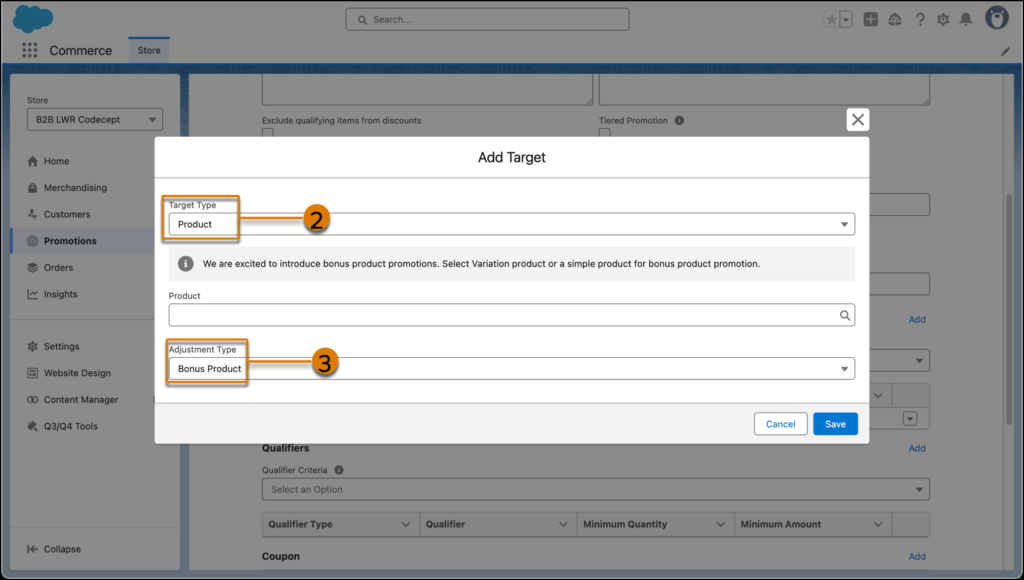
Entice Customers with Promotions That Offer a Bonus Product
Attract more customers and increase cart values by offering a bonus product promotion in your B2B or D2C store. Bonus product promotions automatically add a designated gift product at no additional cost if the cart contents meet specific criteria. Previously, bonus product promotions were applied only if the target item receiving the discount was in the cart.
Where: This change applies to B2B Commerce and D2C Commerce in Enterprise, Unlimited, and Developer editions.
How: In the Promotion Workspace, select the Bonus Product Promotion template (1) for a quick start, or create a promotion from scratch. If you create a promotion from scratch, add a discount target and select Product (2) for Target Type and Bonus Product (3) for Adjustment Type. The target bonus product can be a single variation or a simple product and can be a purchasable or non-purchasable product. If you have an existing store, publish it to see changes for items designated as bonus products. If you don’t publish your store, bonus products behave like regular cart items.
Experience Cloud
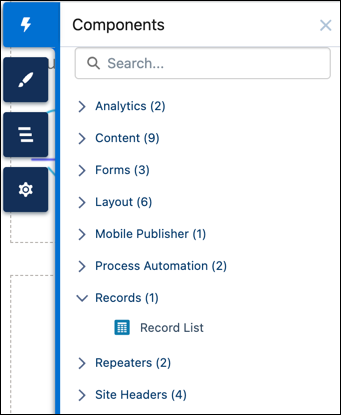
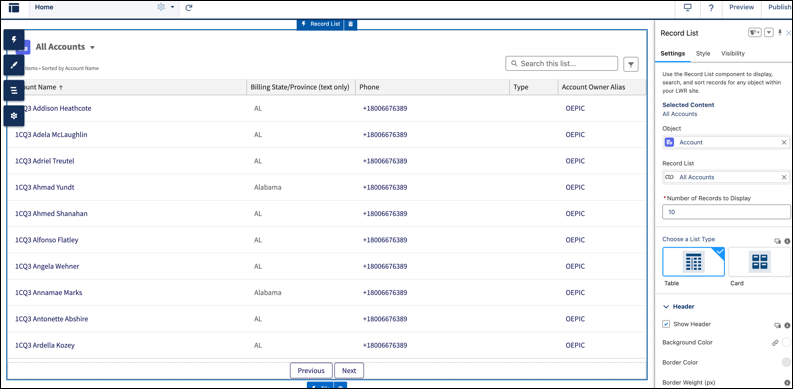
Help Your Site Visitors View Records More Easily with the New Record List Component Help Your Site Visitors View Records More Easily with the New Record List Component
The Record List component for LWR sites helps your site visitors view, search, and sort their accounts, cases, and other data. With properties for component customization and styling, you can make sure that your visitors have a smooth and responsive experience across desktop, tablet, and mobile devices.
Where: This change applies to LWR sites accessed through Lightning Experience and Salesforce Classic in Enterprise, Performance, Unlimited, and Developer editions with active Experience Cloud licenses.
How: To enable navigation between and within objects, in Experience Builder, create a record detail page. Drag the Record List component to the canvas, select your object and list view, and then configure your settings.
For example, an account list can include several details, such as name, billing information, state or province, phone number, and type. Site builders can adjust the display settings for the lists, such as header visibility, colors, and border weight. Add pagination to the lists so that visitors can browse long lists in manageable chunks.
Enable a Modernized Record Experience in Aura Sites (Release Update)
Upgrade the Create Record Form, Record Banner, and Record Detail components to run on Lightning Web Component technology, which improves accessibility and performance. In Summer ’25, the upgrade is enforced for all orgs. We strongly recommend that you test all customized record components before the update.
Where: This change applies to Aura sites accessed through Lightning Experience and Salesforce Classic in Enterprise, Performance, Unlimited, and Developer editions.
When: Salesforce enforces this update in Summer ’25. To get the major release upgrade date for your instance, go to Trust Status, search for your instance, and click the maintenance tab.
Why: When the Use Lightning web components on your record pages in Aura sites setting is enabled, the Create Record Form, Record Banner, and Record Detail components show minor style changes. New Aura sites created after Summer ’24 automatically include upgraded record components. Here are some potential changes.
- Buttons are center-aligned. Previously, they were right-aligned.
- Text in the record window is indented compared to the title. Previously, the text and title were aligned with one another.
- If a form includes required fields, there’s now an explanation that an asterisk indicates a required field. Previously, there was no explanation.
- If a required field is left blank, users now see a red outline around the required field and an inline error message telling them to complete the field.
- Error messages are displayed at the bottom of the record form. Previously, errors were displayed at the top.
- Field focus is highlighted with a yellow background.
- Page headers scroll with the page rather than remaining frozen at the top.
- Success toast messages can refer to Salesforce IDs.
- New icons appear next to various fields and certain icons remain visible without mouseover.
- Links appear in various places where they were previously not included.
How: From Experience Builder, open Setup | Digital Experiences and go to Settings.
Under Experience Management Settings, select Use Lightning web components on your record pages in Aura sites to upgrade your components.
Enhanced Security for Sites Using the Salesforce CDN
Salesforce CDN customers now have enhanced security that automatically protects against malicious traffic and other threats while still allowing access to legitimate bots and search engine crawlers.
Where: This change applies to LWR sites using the CDN accessed through Lightning Experience in Enterprise, Performance, Unlimited, and Developer editions.
Why: Salesforce CDN customers now benefit from enhanced security that provides comprehensive site protection. These enhancements, managed centrally by Salesforce, operate automatically to defend against malicious traffic, crawlers, scrapers, bots, and DDoS attacks. At the same time, legitimate bots and engine crawlers, such as those that index search results and monitor for threats, are preserved. This multi-layered protection ensures consistent security standards across all customer sites and automatically adjusts to respond to new threats.
Simplify Single Sign-On Registration with Flow Builder
To simplify the process of building a registration handler for single sign-on (SSO) into your Experience Cloud site, use Flow Builder instead of Apex. Customize the new Authentication Provider User Registration flow template to create and update users who log in to your site via a third-party identity provider.
Where: This change applies to Aura, LWR, and Visualforce sites accessed through Lightning Experience and Salesforce Classic in Enterprise, Performance, Unlimited, and Developer editions.
Take Advantage of the Latest Features from Mobile Publisher for Experience Cloud
Use External Client Apps to manage your app’s push notifications. Landscape mode is now supported in Mobile Publisher, making it easier to view and interact with your content. Android users can now preview PDFs after downloading them. You’re now notified in-app when a new version of Mobile Publisher is available. Mobile Publisher is transitioning from its own internal release numbering system to align with Salesforce’s internal release numbering scheme.
Where: These changes apply to apps created with Mobile Publisher for Aura and LWR sites in Enterprise, Performance, Unlimited, and Developer editions.
Customization
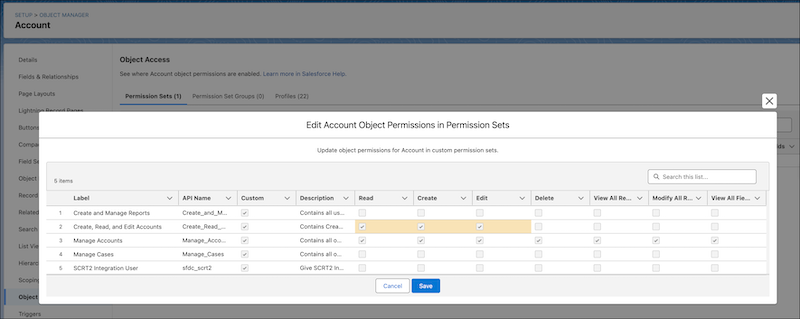
Update Object Permissions for All Custom Permission Sets or Profiles in One Step
Save time and clicks by editing object access simultaneously in all custom permission sets and profiles. There’s no need to go to individual permission set or profile pages. In Object Manager, go to a specific object’s access summary to review, add, or remove object permissions. We delivered this feature thanks to your ideas on IdeaExchange.
Where: This change applies to Lightning Experience in all editions.
How: In Setup, go to Object Manager, and then select an object. In the sidebar, click Object Access. In the Permission Sets or Profiles tabs, click Edit, make your changes, and then save your work.
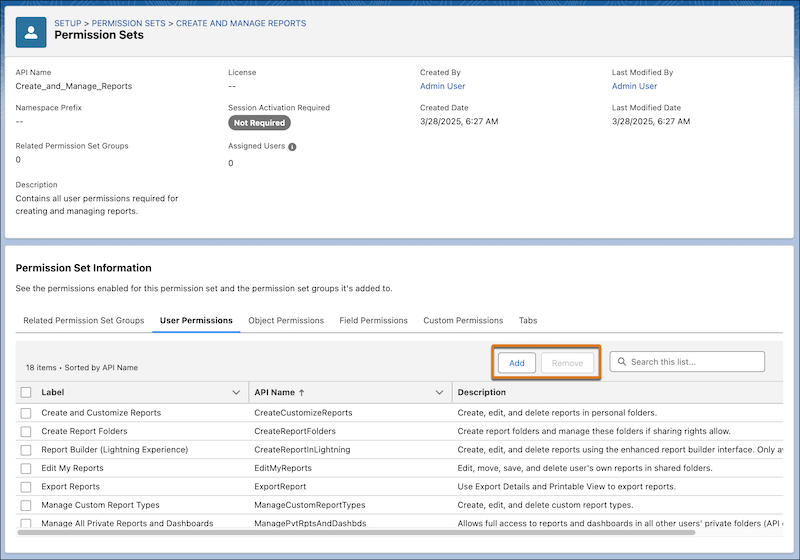
Edit Permissions Faster in the Permission Set Summary
Instead of going to many Setup pages, you can now update the user, object, field, and custom permissions in a permission set directly from the summary view. Previously, you were able to make only minimal permissions edits in the summary. We delivered this feature thanks to your ideas on IdeaExchange.
Where: This change applies to Lightning Experience and Salesforce Classic (not available in all orgs) in Contact Manager, Group, Essentials, Professional, Enterprise, Performance, Unlimited, Developer, and Database.com editions.
How: In Setup, select a permission set, click View Summary, and then update the permissions in the various tabs.
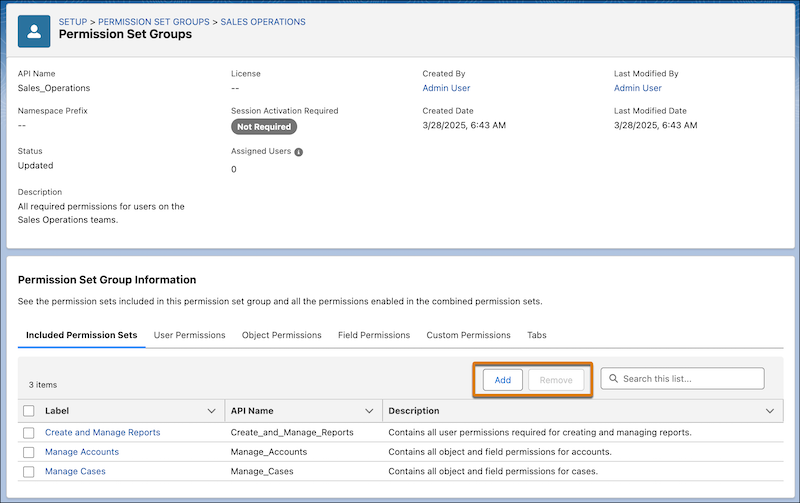
Manage Included Permission Sets in the Permission Set Group Summary
Edit which permission sets are included in a permission set group without leaving the summary view. Previously, this information was read only, so this update makes it easier to take action while reviewing the permission set group. We delivered this feature thanks to your ideas on IdeaExchange.
Where: This change applies to Lightning Experience and Salesforce Classic (not available in all orgs) in Contact Manager, Group, Essentials, Professional, Enterprise, Performance, Unlimited, Developer, and Database.com editions.
How: In Setup, select a permission set group, and then click View Summary. Under the Included Permission Sets tab, click Add or Remove.
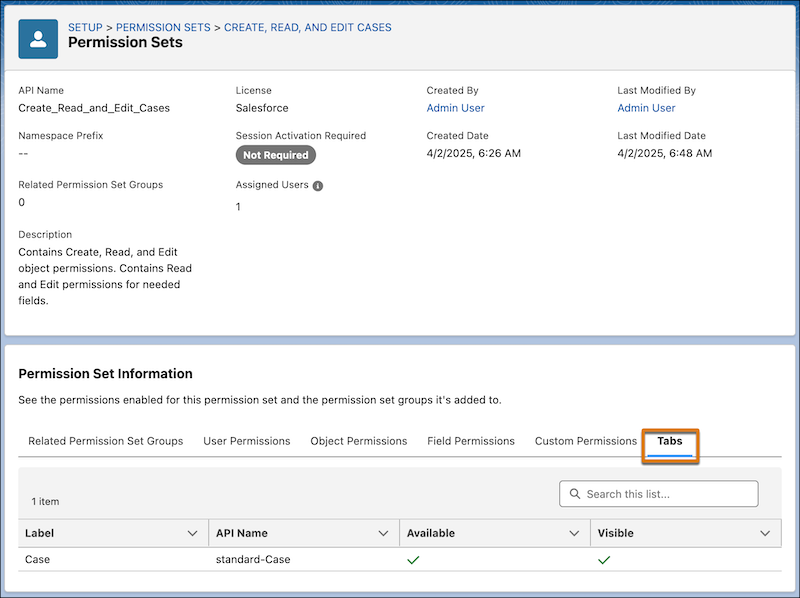
Review Tab Settings in Access Summaries
Easily see the tabs that a user can access or the tabs included in a permission set or permission set group. Using the summary views is faster than searching through multiple Setup pages, which was previously required to get this information. We delivered this feature thanks to your ideas on IdeaExchange.
Where: This change applies to Lightning Experience and Salesforce Classic (not available in all orgs) in Contact Manager, Group, Essentials, Professional, Enterprise, Performance, Unlimited, Developer, and Database.com editions.
How: In Setup, select a user, permission set, or permission set group, and then click View Summary
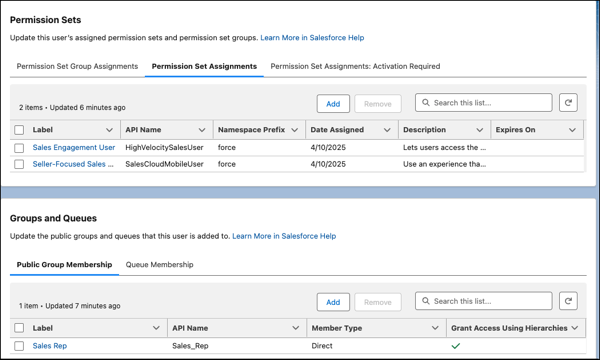
View and Manage a User’s Permission Sets, Groups, and Queues More Easily
If you want to know what permission sets, groups, and queues a user is assigned to, you’re in luck. With enhancements to the user access summary, you can add or remove a user from one or more permission sets, groups, or queues. You can also search, sort, and refresh the lists in each summary section.
Where: This change applies to Lightning Experience and Salesforce Classic (not available in all orgs) in all editions.
How: In Setup, select a user, and then click View Summary.
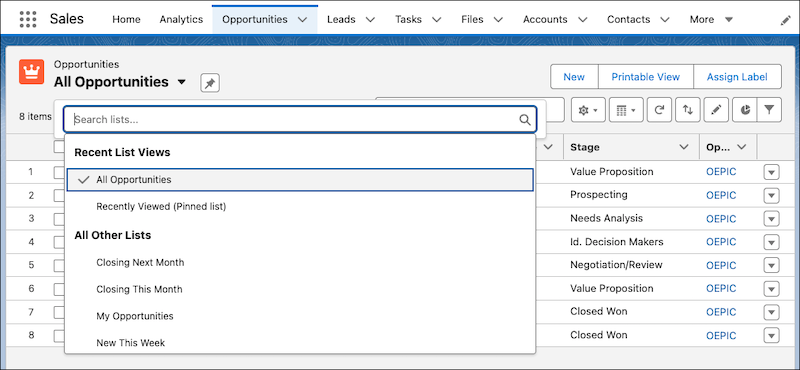
Enhance Accessibility with the Improved List Views Dropdown Menu
To improve accessibility and provide a more consistent user experience, the list views dropdown menu for all objects now uses Lightning Web Components (LWC). Overall, how your users work in list views hasn’t changed, but the updated dropdown menu has some differences. Previously, the updated list views dropdown menu was available only for list views rendered with LWC and not for list views rendered with Aura.
Where: This change applies to Lightning Experience in all editions.
How: The updated list views dropdown menu displays up to 100 lists. It also shows Recent List Views and the option to search your lists at the top of the dropdown. If you have more than 100 list views, use search terms to find a specific list. The keyboard focus for the list views dropdown menu starts with the focus on the top of the list rather than on the currently pinned list.
The updated list views dropdown menu uses a different Document Object Model (DOM) than the previous dropdown menu. The update to the menu’s markup can affect custom functionality that relies on the list view dropdown menu’s DOM structure, as well as the configuration of some built-in features, such as walkthroughs. To make sure that your list views continue to work as expected, review and test the updated dropdown menu.
Analytics
Introducing Tableau Next
Welcome to Salesforce’s end-to-end, agentic analytics experience. Tableau Next integrates the #1 analytics platform with Agentforce’s context-aware AI and the Data Cloud semantic layer that unifies business knowledge across your organization. Composable and API-first, Tableau Next empowers you to create, share, and reuse analytics assets seamlessly. Build and deliver personalized, contextual, and actionable insights for every user, backed by Salesforce’s enterprise-grade performance, security, and scalability.
Where: This change applies to Lightning Experience with Data Cloud. Tableau Next is available in Enterprise, Performance, and Unlimited editions.
Why: Tableau Next is a complete analytics platform for data professionals, business users, and admins.
- Data Integration and Interpretion in the Semantic Layer – Integrate data from various sources and inspect it to ensure data integrity. Create a single source of truth for reliable, governed, reusable models, a metrics store, and streamlined data management.
- Metric, Viz, and Dashboard Composition with World-Class Analysis Tools – Create metrics backed by semantic models to track and assess business processes and performance. Explore data and surface insights that you can act on by building visualizations on related data in your workspace to draw conclusions and make business decisions. Take data visualization to the next level with dashboards, where you can add interactivity, enhance data exploration, and provide a clear overview of the critical information that you need in one place.
- Asset Management, Deployment, and Marketplace – Easily share workspaces and assets with colleagues. Extend Tableau Next throughout your organization by integrating Tableau Next metrics and dashboards into Lightning pages and custom pages using Lightning Web Components. Create your own analytics templates to share your designs and best practices, or use out-of-the-box dashboard templates for a quick start.
- Integrated Action Layer – Engage with Tableau Next metrics, visualizations, and dashboards for effective, data-based collaborations with your team. Customize and personalize Tableau Next on your home page and in your Slack metric digest. Explore and refine metrics to show you the insights most relevant for your work, and stay on track by setting metric goals. Launch integrated flows and actions in Salesforce. And take it all on the road with Tableau Next Mobile.
- Streamlined Setup and Analyst-Savvy Organization – Experience simplified setup and configuration on Tableau Next’s administration page. In Tableau Next personal orgs and ordered workspaces, access all of your tools for data analysis, including data connections, a semantic model builder and metric creator, and visualization and dashboard builders to share findings with others.
Accelerate Sales Cycles with a Conversational Quoting Agent
Close deals faster by using Agentforce Quote Management to conversationally create, update, and manage quotes. Agentforce Quoting responds to conversational prompts, such as “Create a quote for the Acme account” or “Add 10 widgets to the Acme quote,” making it easy for sales reps to manage their quotes using natural language. Shift your sales team’s focus from administrative burdens to strategic customer engagement.
Where: This change applies to Lightning Experience in Enterprise, Unlimited, and Developer editions of Salesforce where Revenue Cloud and Salesforce Foundations are enabled.
When: Agentforce Quoting is available later in Summer ’25.
Who: Users with the Agentforce Default Admin permission set can associate their Agentforce Employee Agent instance to a permission set of their choice in the Agent Access section and assign the Quote Management topic to the agent. Sales reps with the assigned permission set can generate and manage quotes with Agentforce Quoting.
How: To enable Agentforce Quoting, add the Quote Management topic to your agent. To manage quotes with Agentforce Quoting, go to Revenue Cloud and open an account, opportunity, or quote. Click the Agentforce icon and enter your request in the chat. If needed, Agentforce asks for clarification and then generates or updates a quote, which you can review and revise.
Create Meaningful Moments with Campaign Designer (Beta)
New Campaign Designer (beta) functionality helps you quickly generate multi-touch marketing briefs and campaigns that use your trusted data for meaningful moments. When reviewing your draft brief, select an existing campaign to add more context for drafting your campaign. Plus, use AI to quickly and easily refine the message and channels of the draft campaign.
Where: These changes apply to Salesforce Enterprise and Unlimited editions with Marketing Cloud Advanced edition or Marketing Cloud Account Engagement Plus, Advanced, and Premium editions with the Data Cloud and Einstein Requests add-on.
How: After AI features are enabled in Marketing Cloud, you can click the Draft with AI button on the Marketing Cloud home page. The campaign designer walks you through generating a brief, campaign, and components.
Choose Which Dashboard Widgets to Refresh (Generally Available)
Refresh only the dashboard widgets that you need rather than the entire dashboard. For example, a support team member can refresh only the Open Tickets widget to see the most up-to-date list of unresolved issues, without refreshing other widgets on the dashboard.
Where: This change applies to Lightning Experience and the Salesforce mobile app for iOS and Android in Essentials, Professional, Enterprise, Performance, Unlimited, and Developer editions.
When: This functionality is available on a rolling basis starting in Summer ’25.
How: In the dashboard, click the widget’s refresh icon to view its latest data.
Flow
Get Related Records Faster (Beta)
Now you can get related records in a single query in Flow Builder, making it easier to manage related records. Previously, you managed related records by adding separate Get Records elements. With the Get Records element, you can select related object relationships, which can help you reflect complex business logic. Related records in the Get Records element are available in screen flows, autolaunched flows, and template-triggered prompt flows.
Where: This change applies to Lightning Experience and Salesforce Classic in Essentials, Pro Suite, Professional, Enterprise, Performance, Unlimited, Developer, and all Einstein 1 editions.
Why: For example, you use a single Get Records element to retrieve an account and all of its account team members. Then, use the Loop element to send each team member a message.
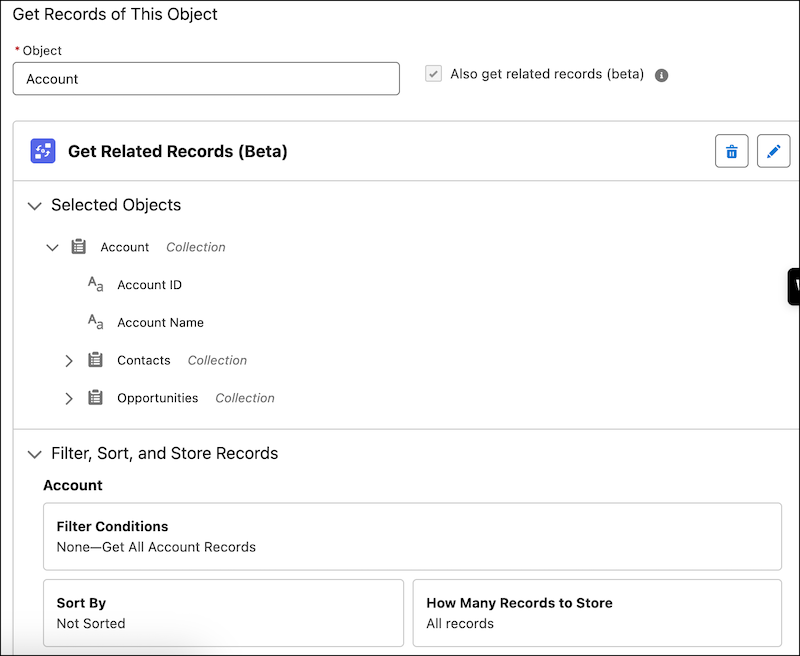
How: To get related records, select an object like Account in the Get Records element, and select Also add related records (beta). Then, add child objects like contacts and opportunities, linking them to the Account object.

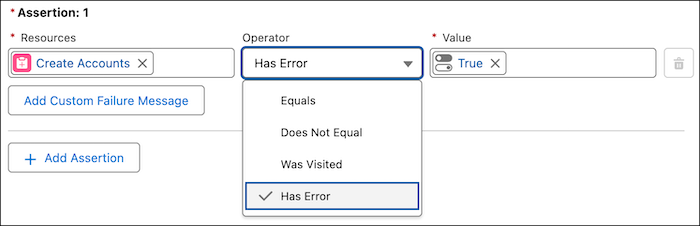
Test Flows for Error Handling
With the new Has Error operator, you can configure negative assertions in a flow test. Intentionally test flow paths where things don’t go according to plan, ensuring that your flows handle errors gracefully. Previously, you configured only positive assertions that tested for successful outcomes, which left gaps in your testing. The Has Error operator is available in flow tests for record-triggered and data cloud-triggered flows. Select the Has Error operator to configure negative assertions for Create Records, Update Records, Delete Records, and Action elements.
Where: This change applies to Lightning Experience and Salesforce Classic in Essentials, Pro Suite, Professional, Enterprise, Performance, Unlimited, Developer, and all Einstein 1 editions.
Why: With negative assertions, your flows can now check for errors and edge cases effectively. For example, consider a flow that processes customer data. You can create a test to make sure the flow handles invalid input, such as a missing required field. This test verifies the flow’s error handling, making your processes more robust.
How: In Flow Builder, create a data cloud-triggered flow or record-triggered flow. Add the Create Records, Update Records, Delete Records, or Action element. Save the flow. Create a flow test and click Set Assertions. For Operator, click Has Error.
Build on Your Successes by Saving an Existing Flow as a Template
Whether you have a flow that performs well or took you a long time to finalize, it’s now easier to save a flow as a template for future use. On the flow properties window, you now have the option to Save as Template, which will add the flow to the templates available when creating a new flow.
Where: This change applies to Lightning Experience in Enterprise, Professional, and Unlimited editions.
Keep Users on One Flow Screen with Automatically Triggered Screen Actions (Generally Available)
Make your flow screens dynamic by running flows in the background automatically. With screen actions you can use additional flow logic without the user leaving the screen. When a user enters a value into a screen component, they see the results of that logic, and updates to the screen in real time. Screen actions help you build screen flows with fewer screens and provide an improved user experience. By default, automatically triggered screen actions run any time their input values are updated, and any time the screen loads, except when a user gets to a screen by clicking the Previous button on the next screen.
Where: This change applies to both Lightning Experience and Salesforce Classic (not available in all orgs) in Essentials, Professional, Enterprise, Performance, Unlimited, and Developer editions. It’s supported only in Lightning runtime for flows.
Why: Now that automatically triggered screen actions are generally available, you can limit when an automatically triggered screen action runs by setting condition requirements that make the user experience more relevant. Setting condition requirements can also help reduce loading times by limiting how much data goes between the screen action and the associated autolaunched flow. Also, you can now have the screen flow run only the first time the screen is loaded.
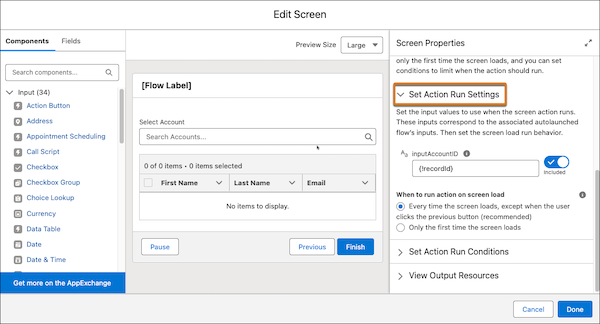
How: In a screen element’s properties, open the Configure Screen Actions section. Select the autolauched flow that you want to run in the background. The Configure Screen Action panel opens.
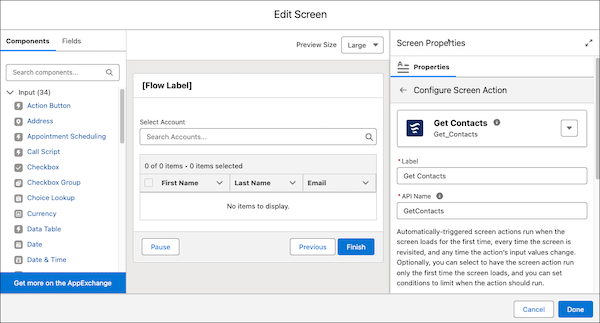
In the Set Action Run Settings section, set the action’s input values and optionally select to run the screen action only when the screen is loaded for the first time.
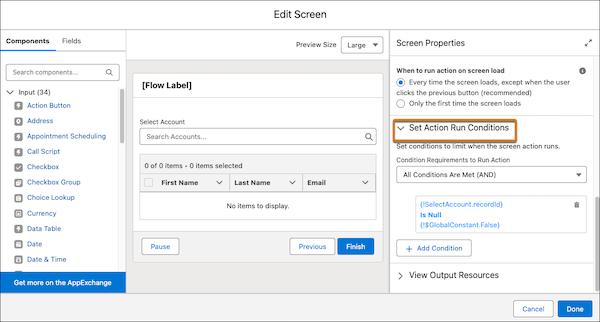
To limit when the screen action runs, open the Set Action Run Conditions section and set your conditions. For example, set a condition to run the screen action only when another screen component has been filled out.
Compose Your Email Content or Select Templates Within the Send Email Action
Write and format your email content directly within the Send Email action, eliminating the need to create a separate text template resource. The body text can include merge fields and be formatted to match your company’s brand. Alternatively, you can now select existing email templates by name instead of bringing the ID of the email template into the flow.
Where: This change applies to Lightning Experience and Salesforce Classic (not available in all orgs) in Essentials, Professional, Enterprise, Unlimited, and Developer editions.
How: Open or create a flow in Flow Builder. In the element menu, search for and select Send Email. To write your email content, go to Configure Email Content. By default, the Compose Email Content option is selected.
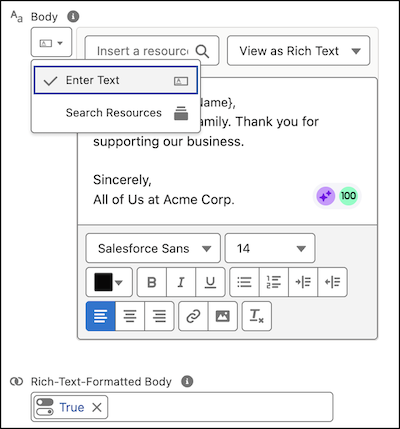
To enter the email content directly, from the Body dropdown, select Enter Text. Format your content by using the rich-text toolbar, which includes options like Bold and Italics. You can also insert upstream resources into the flow as merge fields. To view the text in rich or plain format in the Body, from the dropdown, select View as Rich Text or View as Plain Text. To display the email in rich text format, set Rich-Text-Formatted Body to True. If this option is not set to True, the email is displayed in plain text.
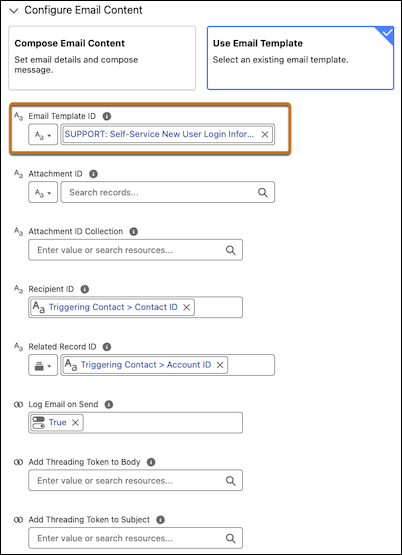
To use an existing email template, go to Configure Email Content and select Use Email Template. The input fields Subject, Body, Rich-Text-Formatted Body, and Use Line Breaks are hidden. Enter the template ID or search for your email template.
Debug Flows at a Glance with the Element-Level Summaries
The debugging experience for flows now includes element-level summaries to help you understand more quickly what happened at each point in a flow. For example, for an Update Records element, the Debug Details pane shows at a glance how many elements were updated after the element was executed. Previously, element-level summaries were available only when debugging marketing flows.
Where: This change applies to Lightning Experience and Salesforce Classic in all editions.
Test Email and SMS Sends with Test Messages
If your flow includes a send email or send SMS action, you can send a test message as part of your debug run. When setting up your debug run, specify the email addresses or phone numbers that you want to use to test your message. When you start the debug run, we’ll attempt to send the message to the specified recipients.
Where: This feature is available in Lightning Experience for flows in Marketing Cloud Growth Edition.
How: In the Debug Flow window, in the Send Test Messages section, select the message types that you want to test. After selecting a message type, you can enter the test recipient’s contact information. When you start a debug run, the message is sent to the test recipients, and details about the send appear in the debug summary panel.
Restrict User Access to Run Flows (Release Update)
This update was first made available in Winter ’24 and was scheduled to be enforced in Winter ’25, but we postponed the enforcement to Winter ’26. With this update enabled, Salesforce restricts a user’s ability to run a flow. A user must be granted the correct profile or permission set to run the flow. When enabled, this release update deprecates the FlowSites org permission, which gave all users in the org access to run any flow. With this update, flows run more securely because only users who are granted correct profiles or permission sets can run flows. Salesforce postponed the enforcement to allow additional time for admins to test and prepare for the change. There is no impact to admins who already enabled the update. We appreciate your adoption of this change.
Where: This change applies to Lightning Experience, Salesforce Classic, and all versions of the mobile app in Essentials, Professional, Enterprise, Performance, Unlimited, and Developer editions.
When: Salesforce enforces this update in Winter ’26. To get the major release upgrade date for your instance, go to Trust Status, search for your instance, and click the maintenance tab. See the knowledge article for frequently asked questions.
Why: Previously, in some cases, all users could run all flows without profiles or permission sets. Enabling this update restricts user access to users who are granted the profile or permission set to run the flow.
How: To apply this update, from Setup, in the Quick Find box, enter Release Updates, and then select Release Updates. For Restrict User Access to Run Flows, follow the testing and activation steps.
After you enable Restrict User Access to Run Flows, all users must be granted access to run a flow. Add the Run Flows permission to a permission set. For more granular access control, restrict specific flow access to an available permission set. We recommend that you disable the Flow User preference in Setup for each user. If the Flow User preference is enabled in a user’s details in Setup, the user can run all flows. To create, update, and delete a flow, add the Manage Flow permission. See the knowledge article for frequently asked questions.
Salesforce®, Sales Cloud® ja muut ovat salesforce.com, inc:n tavaramerkkejä, joita käytetään täällä luvan kanssa.