
Ceili Spring ’25 Release Notes
29.1.2025
Intro
Here is a traditional Ceili’s summary of the upcoming new features and changes in Salesforce’s Spring ’25 release. Salesforce releases an update package three times a year, which contain major and minor reforms. On this page, we have collected the most important updates that may have an impact on your organization’s Salesforce operation, in a compact package.
The blog post briefly introduces each feature in its own paragraph, which also lists the concrete benefits customers will receive and the necessary measures, if there are any in the update. We are happy to help if you need support in implementing new features. You can contact support@ceili.fi
You can easily find the exact time when Salesforce will install the Spring ’25 Release in your own organization at: status.salesforce.com (Maintenance tab). You can display the information by entering the instance number of your Salesforce organization in the search field, which you can find in Salesforce in your company’s information.
Content:
General updates in Salesforce
Unlock AI Agents with Salesforce Foundations
Say hello to autonomous AI agents. Now enabling Foundations unlocks Agentforce and gives you a set of agent conversations to get started.
Where: This feature is available in supported editions for Foundations.
How: To use AI agents, in Setup, go to Salesforce Foundations. If you added Foundations before Spring ’25, add the product with Your Account. If you added Foundations after Spring ’25, add all the required products with Your Account. Then refer to the relevant Salesforce Help to set up your agents.
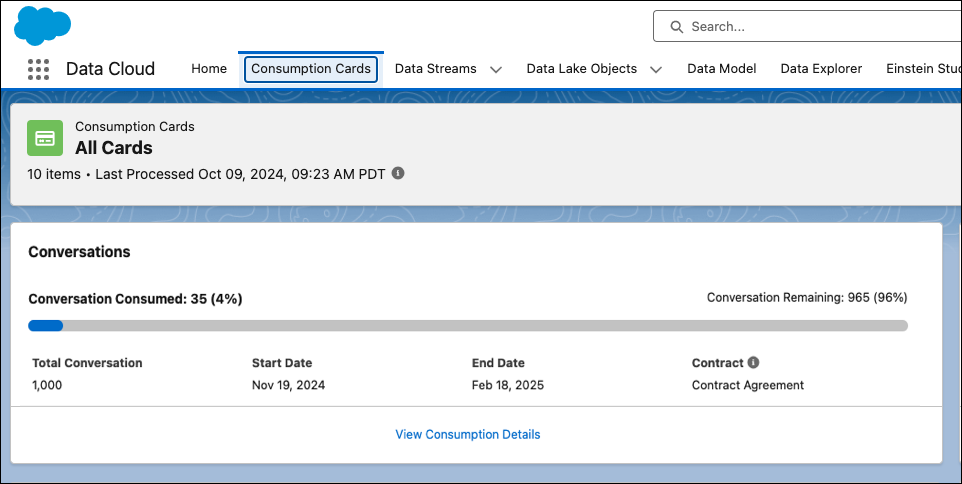
Monitor Your Usage of Sales and Service Cloud Agents with Digital Wallet
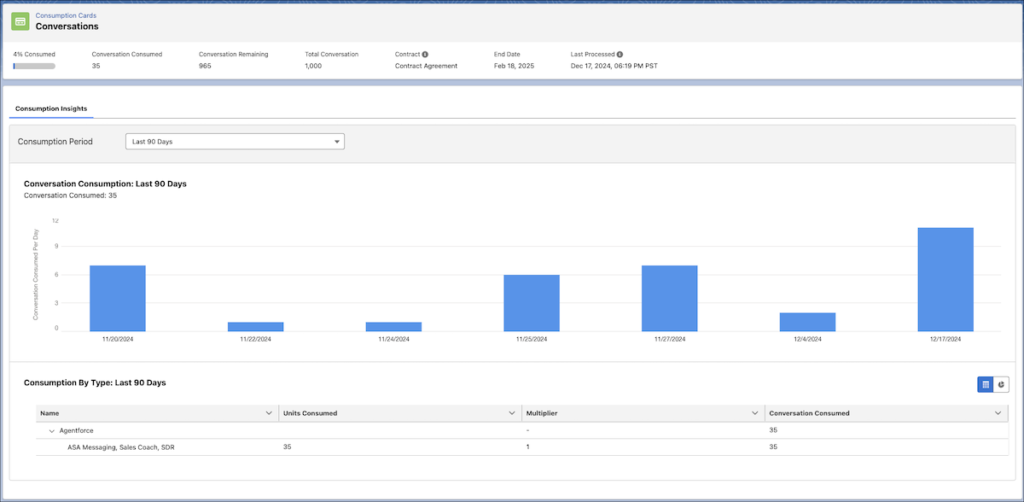
Monitor more of your Agentforce usage for Sales and Service Cloud with Digital Wallet, an account management tool for consumption-based features. Now, on the Digital Wallet homepage, the Conversations consumption card summarizes your org’s combined usage of Agentforce Sales Coach and Agentforce SDR (Sales Development Rep) along with ASA Messaging (formerly Agentforce Service Agent – Inbound). Additionally, Digital Wallet’s Consumption Insights page offers a breakdown of your combined Agentforce usage by time period to help you detect trends over time.
Where: Digital Wallet is available in Lightning Experience in Enterprise and Unlimited editions. SDR is available in Lightning Experience in Enterprise, Performance, and Unlimited editions. Setup for agents is available on the desktop site. Sales Coach is available in Lightning Experience in Enterprise, Performance, and Unlimited editions. ASA Messaging is part of Service Cloud Usage Billing and is available in Lightning Experience in Enterprise and Unlimited editions.
Who: Digital Wallet is available to users with the View Consumption user permission or Your Account access. SDR is available with the Agentforce SDR add-on. Sales Coach is available to users with the Agentforce Sales Coach add-on. Service Cloud Usage Billing is available to users with the Conversation add-on.
How: To get started with Digital Wallet, see Access Digital Wallet. To get started with Agentforce SDR, see Set Up Agentforce SDR. To get started with Agentforce Sales Coach, see Setting Up Agentforce Sales Coach.
Verify Your Return Email Address for Sender Verification (Release Update)
After Spring ’25, to comply with increased email security standards, you’re required to verify the Email Address in My Email Settings.
Where: This change applies to Lightning Experience and Salesforce Classic in all editions except Database.com.
When: Salesforce enforces this update in Spring ’25. To get the major release upgrade date for your instance, go to Trust Status, search for your instance, and click the maintenance tab.
Why: A verified email address is used to send emails from your account. This update allows increased accountability and security for email deliverability.
How: To comply with increased email security standards, emails fail to send from the return email address in My Email Settings until the address is verified. Instruct all users to visit their My Email Settings. Users can manually verify their email addresses by selecting Resend Verification Email and clicking the link in the email. If the resend option is unavailable, the return address is already verified. Users receive a verification email once per release until Spring ’25. The email includes the verification link.
Build Engaging Web Pages and Forms with Salesforce Foundations
Enhance your lead generation strategy with custom web pages and forms. Easily monitor key KPIs with default reports and dashboards. And, thanks to a signup form campaign flow, automate lead creation and marketing consent data updates after customers complete your opt-in form.
Where: This change applies to supported editions for Salesforce Foundations.
Who: To create landing pages and forms, you need the Marketing Manager and Starter Marketing app permission sets. You also need the Modify All Data user permission and a CMS workspace contributor role of Content Manager or Content Admin.
How: To use this feature, in Setup, go to Salesforce Foundations. If you added Salesforce Foundations before Spring ’25, turn on Digital Experiences on this page. If you added Foundations after Spring ’25, turn on all required marketing settings on this page. Then, set up landing pages and forms.
Delivered Idea: Brand the Welcome Email for Internal Users
For more control of branding and user experience, customize the welcome email that internal users, such as employees and contractors, receive when they first access your Salesforce org. For example, change the look of the email to suit your brand, or change the text of the email to include onboarding instructions that are specific to your company. We delivered this feature thanks to your ideas on IdeaExchange.
Where: This change applies to Lightning Experience and Salesforce Classic (not available in all orgs) in all editions.
How: Create a custom classic email template. To make sure that users meet the email verification requirement, include the new {!NewUserWelcomeEmailLink} merge field. The field gets populated with a verification link. When users click the link, they start the email verification process.
From the Session Settings page in Setup, add the email template in the Welcome Email Template field.

Salesforce Functions Is Being Retired
Salesforce Functions is no longer available for purchase or renewal. You can continue using your subscription through your existing order term. To preserve the capabilities that Salesforce Functions provided to your org, deploy an alternative solution before your existing order term ends.
Where: This change applies to Lightning Experience, Salesforce Classic (not available in all orgs), and all versions of the Salesforce mobile app in Professional, Unlimited, and Developer editions.
For the end-of-life timeline and more information on migrating your functions, see Salesforce Functions Retirement on the Heroku Dev Center.
Sales Cloud
Track Progress Toward Sales Account Plan Objectives More Easily
Gain immediate insight into the progress your teams make toward achieving your sales account plan’s measurable objectives. Define the objects, fields, and specific conditions that satisfy your goals for long-term account growth, and select the specific records that you want to track activity on. For example, set a goal for your team to achieve a certain dollar amount from closing a specific set of opportunities. Progress is calculated and updated automatically. Standardize account plan tracking across your enterprise by reusing calculation definitions across all your accounts, specifying different target values for different objectives.
Where: This change applies to Lightning Experience in Enterprise, Performance, and Unlimited editions and in Einstein 1 Sales Edition with Sales Cloud.
Why: Previously, your sales team could only manually edit an objective’s current value. With this enhancement, your sales team has more flexibility to specify and track different types of qualitative and quantitative objectives and include related records.
How: From the Sales Account Plans page in Setup, create and activate the calculation definitions that you want to make available to your sales teams. Two prebuilt calculation definitions are available by default.
As a Sales user, when you add an objective to a sales account plan, select a calculation definition (1), specify a target value (2), and select related campaigns, cases, contacts, or opportunities (3).
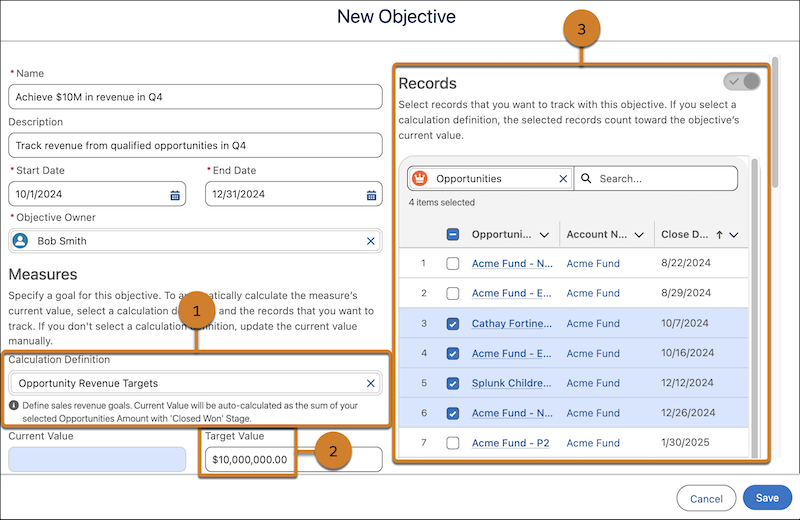
As sales team members complete activity that satisfies the calculation definition’s criteria, the objective’s current value is updated. The current value is updated daily based on activity on the selected records. If users select a different calculation definition or select different records, the current value is updated immediately.
Calculation definitions are optional. You can still create objective measures that require manual progress updates.
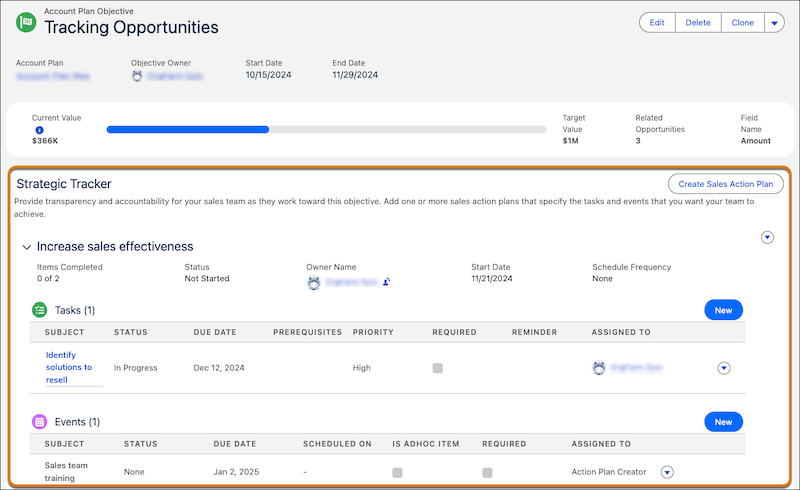
Delivered Idea: Coordinate Your Sales Team’s Activities with More Transparency
Provide accountability and alignment on your sales account team members’ activities. Create sales action plans that specify the tasks and events that you want users to achieve. Associate sales action plans with accounts, cases, campaigns, contacts, contracts, leads, and opportunities. If you use sales account plans, collaborate on the work needed to achieve your measurable goals for long-term account growth by adding sales action plans to each account plan objective’s Strategic Tracker. We delivered this feature thanks to your ideas on IdeaExchange.
Where: This change applies to Lightning Experience in Enterprise, Performance, and Unlimited editions and in Einstein 1 Sales Edition with Sales Cloud.
When: Sales action plans are available on a rolling basis starting in Spring ‘25 and are available to all customers by late March to mid-April 2025. To access sales action plans in a sandbox, they must be available in production first. Then, run the Match Production Licenses tool or request a refresh.
How: Sales action plans extend Industries action plans and use the same standard objects but include the unique Event item type. To get started, go to Sales Action Plans in Setup to assign permissions and create sales action plan templates.
To access sales action plans from most supported objects, add the Action Plans related list to the object’s page layout.
To access sales action plans from a sales account plan, click Action Plans from the objective’s Strategic Tracker. Or, when viewing a sales account plan objective, find sales action plans under the Strategic Tracker heading.
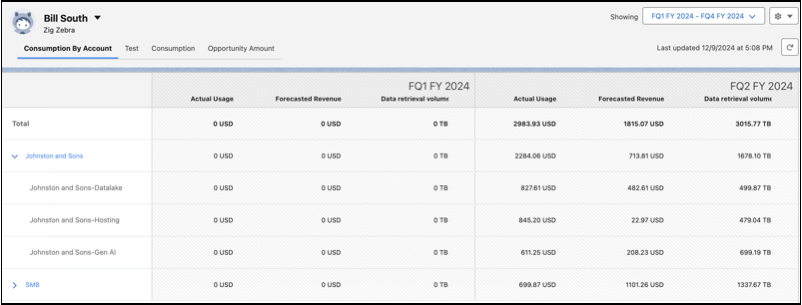
Forecast Your Consumption-Based Business
With Consumption Forecasting, enable your sales team to accurately forecast consumption-based businesses monthly and quarterly. After you create forecast types, your sales team can forecast and view details such as actual and predicted revenue. This feature is an addition to Pipeline Forecasting, so now you can create consumption-based forecasts alongside opportunity-based forecasts.
Where: This change applies to Lightning Experience in Enterprise and Unlimited editions and in Einstein 1 Sales Edition with Sales Cloud.
Why: Consumption Forecasting helps you and your sales team:
- Bring data from your CRM system and from external sources to generate comprehensive forecasts.
- Forecast consumption-based data to provide leadership teams with actionable insights.
- View the historical trends of your metrics aggregated by different dimensions and user hierarchies.
- Adjust forecast values individually or in bulk by smart adjustments.
- Roll up adjustments in the hierarchy in real time.
- Show progress toward quota attainment.
How: Enable Salesforce Forecasting and set up Data Cloud prior to turning on Consumption Forecasting. On the Forecast Settings page, turn on Consumption Forecasting and create consumption-based forecast types.
After you set up Consumption Forecasting, sales reps and managers can view their consumption-based business measures and adjust their own forecasts that are rolled up in the hierarchy.

Service Cloud
Optimize Data Analysis, Reporting, and Decision Making with the Case Milestones Report Type
Create custom reports for cases with or without milestones with the Case Milestones report type. With the Case Milestones report type, you can generate reports related to case milestone fields, which helps you track and analyze SLA violations and entitlements efficiently. This report type also helps you analyze how an SLA has performed in the past, so you can make decisions more easily.
Where: This change applies to Professional, Enterprise, Performance, Unlimited, and Developer editions with the Service Cloud.
How: From the Report Types page, click a new custom report type by selecting Case Milestones as the primary object. Click Edit Layout to edit its properties. To generate custom reports with this report type, select the report type you created with the Case Milestones object and save.
Marketing Cloud
Marketing Cloud Account Engagement
Get Helpful Resources for Enabling Marketing Cloud
A new Optimizer page called Enable Marketing Cloud is available to guide you and your business units as you access new marketing functionality in Salesforce Marketing Cloud. Review curated resources, prerequisites, and tasks to help you take advantage of the power of Salesforce Data Cloud and new Marketing Cloud campaign innovations like Agentforce and SMS. To view these resources, navigate to the Optimizer, and click Enable Marketing Cloud in the Optimizer welcome banner.
Where: This change applies to Account Engagement Growth, Plus, Advanced, and Premium editions with Data Cloud enabled in regions where Marketing Cloud Growth and Advanced editions are supported.
Enhanced Email Experience Is Being Retired
Support for Enhanced Email Experience in Account Engagement ends beginning Winter ’25. To create emails with the same functionality, use the Classic Email Builder or move to the new Marketing Cloud builder (select Edit in builder – New email experience). Notice that your previous emails may not render correctly to the new builder and you might have to do your emails again. Salesforce is going to fix major bugs with the Enhanced builder but future development is focused on the new Marketing Cloud builder.
Where: This change applies to all Account Engagement Editions with Salesforce Professional, Enterprise, Performance, and Unlimited editions.
Marketing Cloud Engagement
Spring ’25 Release coming soon
The Spring ’25 Marketing Cloud Engagement release occurs February 21, 2025 through March 14, 2025. Some features are made available to you within a week of the release. Get an exclusive, in-depth look at the new features by tuning into the Spring ’25 Marketing Cloud Engagement Release New Feature Overview webinar. Stay tuned for updates here!
Marketing Cloud (New)
Want to know more about the new Marketing Cloud? Check Release updates here!
Experience Cloud
Give Experience Cloud App Users the Ability to Log In with One Tap
Use the new Biometric Login Button component to let your users securely log in to your Mobile Publisher for Experience Cloud app with face or fingerprint recognition. The component creates a button that brings up the face or fingerprint login prompt. App users can tap the button to retry biometric login if they initially dismiss the prompt, or if their previous attempt to log in with face or fingerprint recognition fails.
Where: This change applies to apps created with Mobile Publisher for Aura and LWR sites in Enterprise, Performance, Unlimited, and Developer editions. You must have at least one active community license in your org to use this feature. The Biometric Login Button component is supported only on Experience Cloud apps configured with User Opt-In Biometric Login.
How: Configure User Opt-In Biometric Login through your Experience Cloud app’s connected app custom attributes. In Experience Builder, drag the Biometric Login Button component to your app’s login screen and configure the button’s properties.
Enable a Modernized Record Experience in Aura Sites
Starting in Winter ’25, you can upgrade record components in your Aura sites and see improved accessibility and stylistic changes. Upgraded Create Record Form, Record Banner, and Record Detail components run on Lightning Web Component technology, which improves accessibility and performance. In Summer ’25, the upgrade is enforced for all orgs. We strongly recommend that you test all customized record components before the update.
Where: This change applies to Aura sites accessed through Lightning Experience and Salesforce Classic in Enterprise, Performance, Unlimited, and Developer editions.
When: Salesforce enforces this update in Summer ’25. To get the major release upgrade date for your instance, go to Trust Status, search for your instance, and click the maintenance tab.
Why: When the Use Lightning web components on your record pages in Aura sites setting is enabled, the Create Record Form, Record Banner, and Record Detail components show minor style changes. New Aura sites created after Summer ’24 automatically include upgraded record components. Here are some potential changes.
- Buttons are center-aligned. Previously, they were right-aligned.
- Text in the record window is indented compared to the title. Previously, the text and title were aligned with one another.
- If a form includes required fields, there’s now an explanation that an asterisk indicates a required field. Previously, there was no explanation.
- If a required field is left blank, users now see a red outline around the required field and an inline error message telling them to complete the field.
- Error messages are displayed at the bottom of the record form. Previously, errors were displayed at the top.
- Field focus is highlighted with a yellow background.
- Page headers scroll with the page rather than remaining frozen at the top.
- Success toast messages can refer to Salesforce IDs.
- New icons appear next to various fields and certain icons remain visible without mouseover.
- Links appear in various places where they were previously not included.
How: From Experience Builder, open Settings | Experience Management Settings and select Use Lightning web components on your record pages in Aura sites to upgrade your components.
Update the URL of Your LWR Site
Some older LWR sites include /s at the end of the site’s base URL, making it difficult to achieve a completely custom site URL. Now, you can remove this unwanted element and switch from https://mycustomdomain.com/s to a clutter-free https://mycustomdomain.com. Removing /s is also a prerequisite when upgrading to an enhanced LWR site.
Where: This change applies to LWR sites accessed through Lightning Experience and Salesforce Classic in Enterprise, Performance, Unlimited, and Developer editions.
How: You can update the URL in the URL Update area of the site’s Administration workspace. When you update the URL, the change takes immediate effect on the live site. We automatically redirect the site’s pages and update any custom URLs. However, if you use hard-coded URLs as part of your site implementation, you must update these references manually.
Strengthen Your Customer Identity Implementation with New Features and Security Updates
Give users the ability to log in to headless apps with more options than just their username. Set up SAML single sign-on with the external client apps framework, the new generation of the connected apps framework. To avoid potential service interruptions, review security changes for integrations that use the services/oauth2/singleaccess endpoint. Also, the Triple DES SAML encryption algorithm is being deprecated.
Where: These changes apply to LWR, Aura, and Visualforce sites accessed through Lightning Experience and Salesforce Classic (not available in all orgs) in Enterprise, Performance, Unlimited, and Developer editions.
How: For more information about these changes, see these release notes.
Analytics
Keep Charts Consistent with Reordered Report Data
When you sort by a field, the report chart updates to match the new order so that it’s consistent with the data table. For example, if you sort regions by descending order of sales, the chart reorders the regions accordingly, making it easier to interpret your data.
Where: This change applies to Lightning Experience in Essentials, Professional, Enterprise, Performance, Unlimited, and Developer editions.
How: On the widget, click the Chart Properties icon , and select Sort Report Charts.
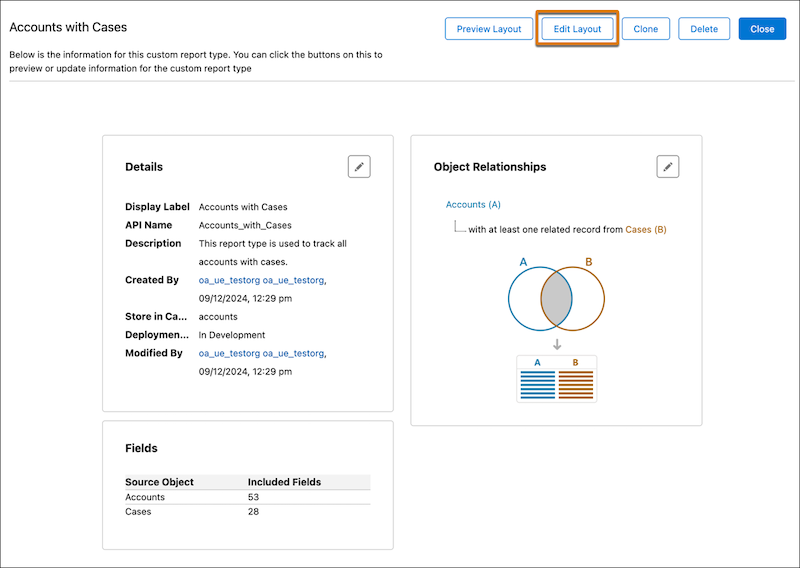
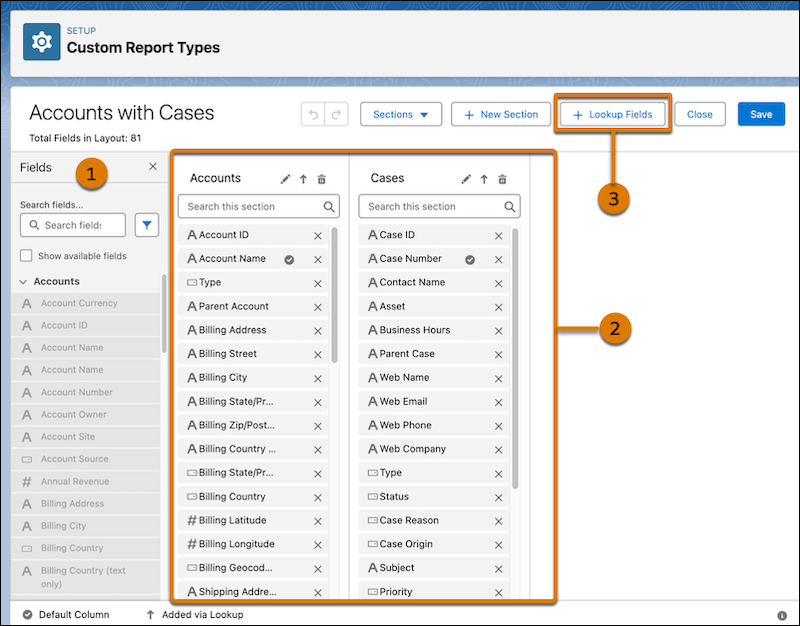
Delivered Idea: Do More with Custom Report Types (Generally Available)
Find your report types more easily, and create personalized list views of your custom report types using the improved Custom Report Type page in Setup. Edit report details and modify object relationships on the summary page, which now has a more compact layout. The redesigned report type layout editor provides more flexibility when managing custom fields and sections. And you can add up to 1,000 fields in the report type layout using lookup fields. We delivered this feature thanks to your ideas on IdeaExchange.
Where: This change applies to Lightning Experience in Essentials, Professional, Enterprise, Performance, Unlimited, and Developer editions.
How: In Setup, in the Quick Find box, enter Reports and select Reports and Dashboards Settings. Select Enhanced Custom Report Type Setup Page. Then, in the Quick Find box, search for and select Report Types.
On the redesigned summary page of your custom report type, click Edit Layout.
Drag fields from the Fields panel (1) to the appropriate section on the right. You can search for fields, move them, view their details, and customize their display names (2). To find lookup fields and add them to the report type, click Lookup Fields (3).
Customization
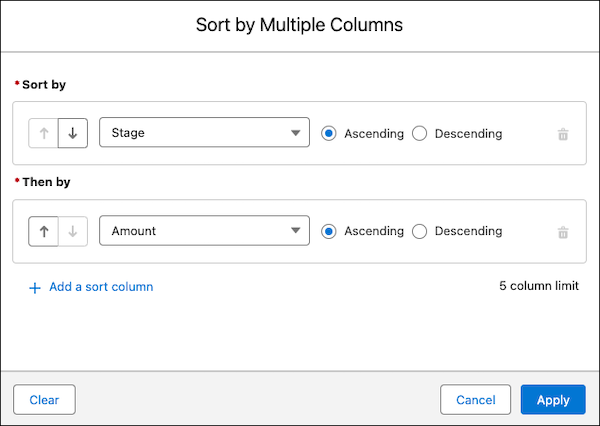
Sort List Views by Multiple Columns
To see your data in a more intuitive way and to make your list views more actionable, you can now sort list views on object home pages by up to five columns. Select the columns to sort by and whether to sort each column in ascending or descending order. To return to sorting by a single column, click a column header that isn’t included in your multiple column sort. Sorting by multiple columns affects only your user preferences, and you can’t save your multi-column sorting configuration as a default. We delivered this feature thanks to your ideas on IdeaExchange.
Where: This change applies to Lightning Experience in all editions, except Starter and Pro Suite.
When: Sort list views by multiple columns is generally available on a rolling basis starting in Spring ’25.
How: To sort a list view by multiple columns, from a list view, click and then select the columns to include in the sort. Click Apply.

For example, create a Cases list view that’s sorted by Contact Name, then by Priority, and then by Date/Time Opened. Or you can create an Opportunities list view sorted by Close Date and then by Amount.
Your list sort configuration is saved until you modify or clear it. To return to the default sort order, click settings, and then select Reset Column Sorting.
If you don’t see the option to sort list views by multiple columns yet, you can still enable the beta version of the feature. From Setup, in the Quick Find box, enter User Interface and select it. Then select Enable sort by multiple columns (Beta). After you opt in to use the beta feature, list views for all supported custom and standard objects are rendered with Lightning Web Components (LWC) instead of with Aura.
View and Filter on More Fields in the Enhanced User List View
You can now work with user list views more effectively with new added fields. Add the Delegated Approver, End of Day, Is Partner, Start of Day, User Verified Email, User Verified Mobile Number and Password Expiration Date fields to your user list views. Then sort, filter, search, and edit your user records using these fields
Where: This change applies to Lightning Experience and Salesforce Classic (not available in all orgs) in Enterprise, Performance, Unlimited, and Developer editions.
How: From Setup, in the Quick Find box, enter Users, and then select User Management
Settings. Enable Enhanced User List View. To view the enhanced page, from Setup, go to the Users page. To change and reorder the columns displayed in a list view, select Select Fields to Display.
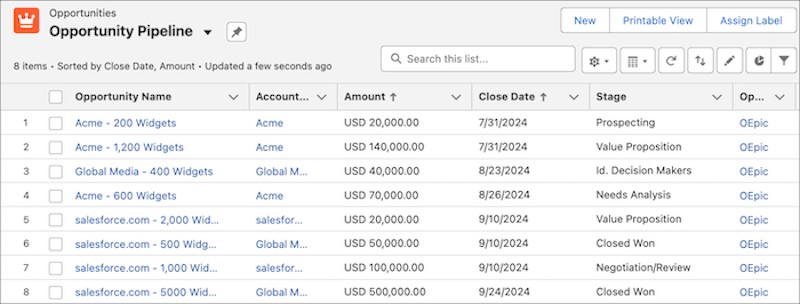
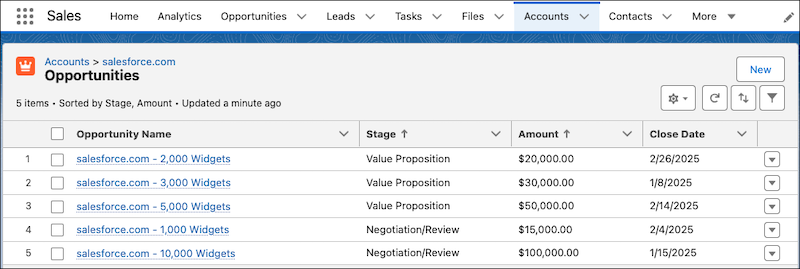
Organize Your Data with Multi-Column Sorting for Related Lists
To organize and understand your data better, sort related lists by up to five columns. Quickly identify patterns and trends so that you can make informed decisions. Previously, you could sort a related list by only a single column. We delivered this feature thanks to your ideas on IdeaExchange.
Where: This change applies to Lightning Experience in all editions except Starter and Pro Suite.
How: To sort by multiple columns, from a related list, click View All, and then click arrows. Select the columns to include in the sort, and then click Apply.
For example, let’s say that you have an Opportunities related list on the Account page. Sort the Opportunities related list by Stage and then by Amount.
Your list sort configuration is saved until you modify or clear it. To return to the default sort order, click settings, and then select Reset Column Sorting.
Sort by multiple columns affects only your user preferences. You can’t save your multi-column sorting configuration as a default.
Manage Included Permission Sets in Permission Set Groups via Summaries
Update access more efficiently by specifying which permission set groups include a permission set directly from the permission set’s summary. Previously, to manage included permission sets, you were required to navigate to each permission set group’s page. We delivered this feature thanks to your ideas on IdeaExchange.
Where: This change applies to Lightning Experience and Salesforce Classic (not available in all orgs) in Contact Manager, Group, Essentials, Professional, Enterprise, Performance, Unlimited, Developer, and Database.com editions.
How: From Setup, in the Quick Find box, enter Permission Sets, and then select Permission Sets. Select a permission set, and then click View Summary. In the Related Permission Set Groups tab, click Add or Remove.

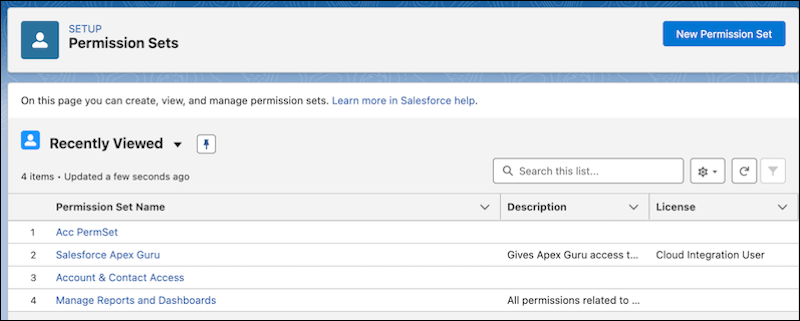
Manage Permissions Sets with the Enhanced List View
This revamped user experience provides streamlined navigation, improved filtering options, search capabilities, and a more intuitive layout. This enhancement makes it easier to manage and navigate through permission sets. Key improvements include advanced filtering options, a more organized layout, and quicker access to critical actions.
Where: This change applies to Lightning Experience and Salesforce Classic (not available in all orgs) in Professional, Enterprise, Performance, Unlimited, and Developer editions.
How: From Setup, in the Quick Find box, enter Users, and then select User Management Settings. Enable Enhanced Permission Set List View. To view the enhanced page, go to the Permissions Sets Setup page.
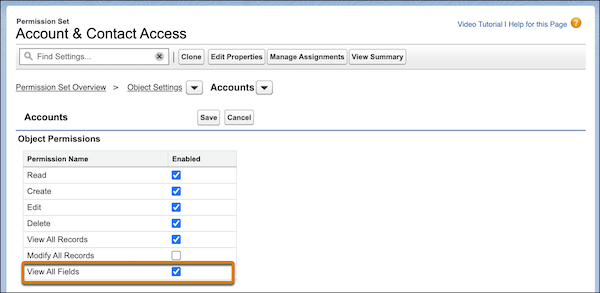
Allow Users to View All Fields for a Specified Object
It’s easier to manage permissions for users who require broad data access. Assign the object-level View All Fields permission, which grants assignees access to all fields and field data for a specific object. This permission is available for all standard and custom objects that support field permissions. Users are automatically granted access for any new fields created for the object. We delivered this feature thanks to your ideas on IdeaExchange.
Where: This change applies to Lightning Experience and Salesforce Classic (not available in all orgs) in all editions.
How: We recommend that you manage permissions in permission sets, not profiles. In Setup, select a permission set. On the Object Settings page for a specific object, enable the View All Fields permission, and then save.
Einstein
Add AI-Powered Quick Actions to Record Pages
Make the power of AI work for you with agent quick actions. Create these actions just as you would any quick action in Setup, and then add them to your record pages. With the addition of AI-backed quick actions on record pages, your users can quickly discover how helpful an agent can be in their day-to-day tasks.
Where: This change applies to Lightning Experience and the Salesforce mobile app for iOS and Android in Enterprise, Performance, and Unlimited editions. On mobile, agent quick actions are available on the record home page.
When: This feature isn’t part of the initial Spring ’25 release and may be included at a later date.
How: Create a quick action for an object in Object Manager in Setup, and select Agent Action as the action type. Add an utterance for what you want the action to do. For example, if your action is meant to summarize a contact, use “Summarize this contact” as the utterance and name the action Summarize. Then, add the action to your Lightning record page using the page layout editor. Users see an icon to show that the action is AI-powered. After a user clicks the AI-enhanced quick action, the action triggers the agent and works as though the user had typed the utterance in the agent panel. Expanding on the previous example, clicking a Summarize button works the same way as having a user enter “summarize this contact” in the agent panel.
Build, Test, and Troubleshoot Agents More Easily with Agent Versions
Now you can create multiple versions of an agent, so you can iterate on, test, and troubleshoot your agents while minimizing downtime and risk. Create a version of an active agent to make and test changes without taking the active version out of production. Or create a version to save as a backup, so you can quickly revert to a previous version if your business strategy changes or you need to debug an issue. You can create up to 20 versions of a single agent. The number of concurrently active agents supported varies by agent type. For example, you can only have one active version of type Agentforce (Default).
Where: This change applies to Lightning Experience in Enterprise, Performance, Unlimited, and Developer editions for an additional cost. Required add-on licenses vary by agent type. Setup for AI agents is available on the desktop site.
When: This change is available starting early February 2025.
How: To create a version of an agent, from the Agents Setup page, click the dropdown menu next to the agent you want to create a new version of and select Save As New Version. You can also delete an agent version from the dropdown.
You can quickly switch between agent versions in the Agent Builder and on the Details page for your agent.
Customize Explicit Filters in Search Manager (Einstein Search)
Tailor the explicit search filters to address specific objects and profiles. For example, customize the search filters that appear for the Contacts object specifically for the Contract Manager profile.
Where: This change applies to Lightning Experience in all editions
When: This functionality is rolling out to all entities starting in Spring ’25.
Advanced Lookup Search Has an Updated UI
For easier viewing, the Advanced Lookup window now lists possible matches under the search bar, not in a dropdown. To change the sorting parameter for search results, click the column titles. If you don’t find the proper result, create a record from the Lookup input field, not from the Advanced Lookup window.
Where: This change applies to Lightning Experience in all editions except Database.com.
Read our latest content

Salesforce Flex Credits: What Are They and How Are They Used?
Salesforce licensing is changing. Alongside the traditional seat-based model, Salesforce is increasingly introducing consumption-based pricing, where costs depend more directly on what is actually done

Slack – Where collaboration meets your Salesforce context
Starting its exponential growth from the Silicon Valley in the mid 2010s, Slack has since become the standard team collaboration tool used by businesses and

Helvar’s marketing covers the entire customer lifecycle with Salesforce Marketing Cloud
Helvar is a Finnish technology company that develops intelligent lighting solutions by combining lighting, data, and automation. The goal is to improve energy efficiency, the
Salesforce®, Sales Cloud®, and others are trademarks of salesforce.com, inc., and are used here with permission.